
Applications often need to hold secrets. Connection strings, passwords, certificates, and other credentials are among the information applications may need but that must not be made available to the public. Where can this information be securely stored? Conjur AWS IAM Authenticator is a great, secure way to store your applications’ secrets. But the secrets don’t exist in isolation; to be useful, your applications must be able to access the secrets they need. How does Conjur know which secrets an application should be able to access? Conjur authenticators validate requestors, and role-based access controls (RBAC) and policies authorize the access.
Out of the box, Conjur comes with an IAM authenticator. This lets you map IAM roles to pre-configured Conjur identities so that an EC2 instance or Lambda function assigned a specific IAM role will automatically have access to the secrets available to that role. Note that there’s a difference between IAM roles and users. Users have a permanent set of credentials while roles are a set of capabilities that can be assigned to an entity (a Lambda function, an EC2 instance, or other entities).
To get started, you’ll need to create a new resource stack on AWS for Conjur that contains both an EC2 instance and a PostgreSQL instance. The EC2 instance will default to an m4.large instance, but for a basic test, an instance of this size isn’t necessary. You can use a t2.micro instance for testing. To create these resources, use the CloudFormation template, which will prompt you for basic information and allocate the resource. You’ll be prompted for passwords to assign to the instance, and you’ll need these passwords later in the process.
After the application stack is created, it needs to be configured to enable IAM authentication. This is done by setting an environment variable. You’ll also need a policy definition that defines what secrets Conjur will hold and which roles will have access to them. The policy is defined in a YAML file, explained in this tutorial. Instead of usernames, we’ll use strings that identify IAM roles. We’ll see how this string is derived in a moment. You’ll also want to install the Conjur CLI locally. This will allow you to connect to the Conjur instance and make configuration changes from your workstation. You can install the Conjur CLI as a Docker image.
You’ll need the Conjur CLI to load policies into your Conjur instance. The following policy creates an IAM authentication instance with a service ID of dev (there can be multiple instances of authenticators, each with their own service ID):
# policy id needs to match the convention `conjur/authn-iam/<service ID>
- !policy
  id: conjur/authn-iam/dev
  body:
    - !webservice
    - !group clients
    - !permit
      role: !group clients
      privilege: [ read, authenticate ]
      resource: !webservice
This policy would be loaded as a root policy in Conjur using the Conjur CLI. If you saved this policy in a file named root-policy.yml, you’d use the following command to load it:
conjur policy load root root-policy.yml
A policy also defines the secrets that will be available. In the following, I define a policy for a role with the name TrustedWithSecret that gives it access to a single variable named connectionstring. If you use this file, substitute your own AWS account ID in place of the value 000000000000.
- !policy
  id: secretApp
  body:
    - &variables
      - !variable connectionstring

# Create a group that will have permission to retrieve variables
    - !group secrets-users

# Give the group permission to retrieve variables
    - !permit
      role: !group secrets-users
      privilege: [ read, execute ]
      resource: *variables

# Create a layer to hold this application's hosts
    - !layer

# The host ID needs to match the AWS ARN of the role we wish to authenticate.
    - !host 000000000000/TrustedWithSecret

# Add our host into our layer
    - !grant
      role: !layer
      member: !host 000000000000/TrustedWithSecret

# Give the host in our layer permission to retrieve variables
    - !grant
      member: !layer
      role: !group secrets-users
This policy would be a child of the policy defined earlier. When I loaded the previous policy, one of the parameters passed was the identifier root, which specified the parent of the policy being loaded. The policy loaded there had an ID of conjur/authn-iam/dev. To load this policy as a child of that one, we must use the ID value conjur/authn-iam/dev in the command arguments when loading this policy. If this policy were saved in a file named trusted-with-secrets.yml, the
command for loading it would be:
conjur policy load conjur/authn-iam/dev trusted-with-secrets.yml
While the policy specifies that that value is to be available, it doesn’t assign a value to the variable. You can assign the value using the Conjur CLI. When assigning a value, you must use the fully qualified name of the variable. This name will be the IDs of all the parent policy branches concatenated together, separated by a forward slash. The fully qualified name of our connectionstring variable is conjur/authn-iam/dev/secretApp/connectionstring. The command to set a value to this variable is:
conjur variable values add conjur/authn-iam/dev/secretApp/connectionstring your-selected-value-here
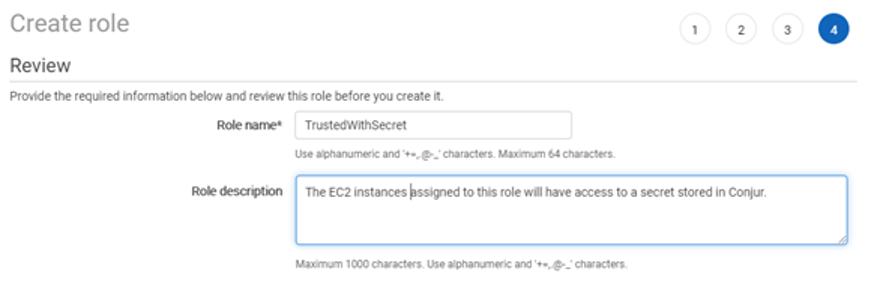
To create a new role for an application, log in to the AWS console and open the IAM page. On the left side of the page you’ll see an option for “Roles.” Select it, then select the “Create role” button on the main pane. The types of services a role can be assigned to will be listed. Under “Common use cases.” Select “EC2,” then click on “Next: Permissions.” In this case, we don’t need any permissions for this role. It’s only being used for group assignment. Click on “Next” until you reach the review page. Here a name must be assigned to the role. I’m going to use the name TrustedWithSecret. Enter a name and an appropriate description and select “Create Role.”
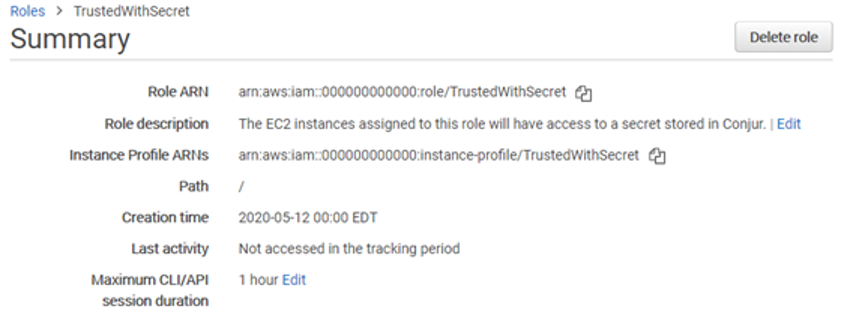
The roles in your AWS account are now listed. Find the role you just created and click on it to review its details. Next to the field “Role ARN” you’ll see a string that uniquely identifies the role. This string contains the Amazon account number (displayed below as all zeros) and the role name. This information is needed when identifying the role in the Conjur policies. Within a policy, the string used is the account number and role name combined, separated only by a backslash. For the role below that values would be 000000000000/TrustedWithSecret.
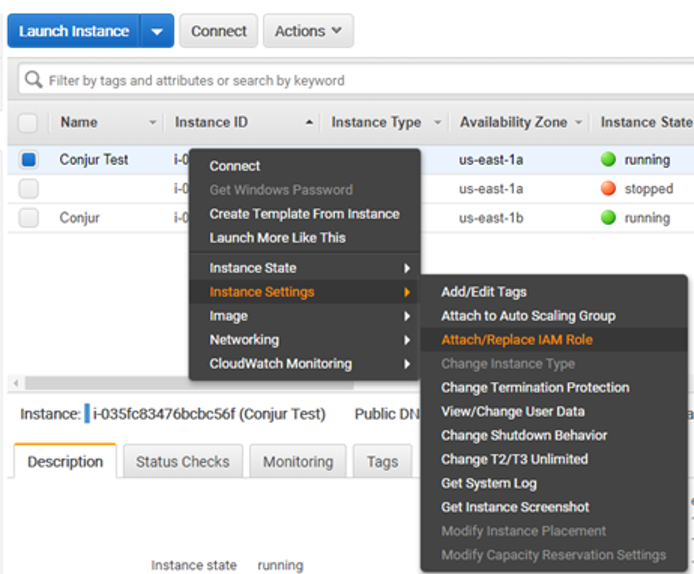
Now create a basic EC2 instance. A micro instance will be fine for this tutorial as we won’t be doing any memory- or CPU-intensive work. After the instance is created, you’ll see it among the list of other E2C machines. Right-click on the instance, select “Instance Settings”, and then select “Attach/Replace IAM Role.” On the next screen select the IAM Role that was created earlier (I used TrustedWithSecret) and click on Apply. This is the instance in which your code will run. It has visibility on the role assignment and will use it for requesting a secret. If the code ever needs to be given access to a different set of secrets, the IAM Role on the instance can be
changed and no changes to the code would be needed. You’d only have to ensure that Conjur has a configuration for the other role.
Now we’re going to create a program that will retrieve a secret and print it to a console. In a real program, we’d never want to print secrets to the console or do anything else that might expose them. This is only for the purpose of testing the API. Conjur supports a REST API and also has client libraries for Java, Go, Ruby, and .NET. We’ll use the Java library. To get a JAR of the client library, clone the Java library and compile it with the following command:
mvn install -DskipTest
Our Java application must be able to read the IAM role of its host machine. The role can be queried by making a simple request to the URL http://169.254.169.254/latest/meta-data/iam/info. This will work only from the EC2 instance. Note that this won’t work from your development machine since it’s not part of the AWS network. The response to the request will be a JSON object that contains the role and account id.
{
    "Code" : "Success",
    "LastUpdated" : "2020-05-14T12:00:00Z",
    "InstanceProfileArn" : "arn:aws:iam::000000000000:instance-
        profile/TrustedWithSecret",
    "InstanceProfileId" : "AAAAAAAAAAA1111122222"
}
We can construct the value we need to pass to Conjur from this information. This is a small Java program that will query the value and construct it in the needed format:
public static void main() throws IOException {
    URL queryRoleUrl = new URL(
        "http://169.254.169.254/latest/meta-data/iam/info"
    );

    BufferedReader reader = new BufferedReader(
        new InputStreamReader(queryRoleUrl.openStream())
    );

    StringBuilder sb = new StringBuilder();
    String line;
    while ((line = reader.readLine()) != null) {
        sb.append((line));
    }

    JSONObject arnInfo = new JSONObject(sb.toString());
    String arnString = arnInfo.getString("InstanceProfileArn");
    String[] arnParts = arnString.split(":");
    String RoleName = arnParts[5].split("/")[1];
    String hostName = String.format("host/%s/%s", arnParts[4], RoleName);
    System.out.println(hostName);
}
To make this value available to Conjur clients running on this instance, this value is added to the environment variable CONJUR_AUTHN_LOGIN. The Conjur class library will automatically retrieve this value from the environment variable.
Your application also needs the URL of the Conjur instance and will look for the information in the environment variable CONJUR_AUTHN_URL. The value will come from the name or the URL of your Conjur instance. It will be formatted as http://87.65.43.21 or http://ec2-87-65-43-21.compute-1.amazonaws.com.
You’ll also need to set a variable that contains the Conjur account name you used when entering information into CloudFormation. If you’ve forgotten this value, you can view it in the AWS console by opening the CloudFormation screen, selecting the software stack for Conjur, and selecting the Parameters tab.
The Java code for retrieving the secret is only a few lines:
static final String SECRET_KEY = "connectionstring";
Conjur conjur = new Conjur();
String secretValue = conjur.variables().retrieveSecret(SECRET);
System.out.println(secretValue);
Run this code and you’ll see the value retrieved from Conjur printed to the console.
In just a few steps, we were able to set up a Conjur instance and the IAM authenticator and we enabled an EC2 instance to retrieve secrets from Conjur based on its IAM role. IAM-based authentication also works for Lambda functions. It’s easy to use Conjur to store secrets for most AWS applications. If you’d like to learn more about Conjur, you can find more information on the Conjur documentation site. You can read more about building policies and the available options here.
Joe Garcia is a DevOps Security Engineer with CyberArk. As CyberArk’s automation expert, he enjoys sharing his knowledge with the community through conferences, workshops, videos, and this blog. When not sharing, Joe enjoys learning and tinkering on cutting edge technologies to get ahead of the next big tech wave. Be sure to follow him on Twitter at @Joe_Garcia to see where he’ll end up next.