
Maintaining secrets in a secure way is an important — though often overlooked — aspect of security. DevOps security often addresses vulnerability scanning, yet overlooks hard-coded secrets, potentially leading to massive breaches. The far-reaching SolarWinds hack, for example, may have inserted malicious code into continuous integration and continuous delivery (CI/CD) pipelines via an insecure password to a legitimate certificate.
For this reason, many organizations go through maturity stages when handling secrets, gradually improving their DevOps security. With properly-secured secrets, teams can be confident in their product and compliant with regulations.
Jenkins is one of the leading DevOps tools. Ensuring security of Jenkins and its DevOps pipeline requires securing the entire Jenkins server. This begins from the code repositories, continues through deployment, and extends into the monitoring and continuous improvement phase. This security practice also involves securing secrets and ensuring they are not hardcoded in the source code. Build servers can scan for bad code and practices that result in runtime bugs, but they are not able to scan keys or ensure production secrets are not pushed to the repository.
The CyberArk Conjur plugin secures the entire Jenkins CI/CD pipeline by moving hardcoded values and passwords to a secure enclave outside the Jenkins process. Conjur securely provides secrets and easily enables IT teams to rotate keys and secrets for sensitive resources such as databases and external APIs. In this article, we examine the risks of unprotected secrets and explore areas of your DevOps pipelines you can secure using Conjur.
Unprotected Secrets in DevSecOps
Legacy software integration pipelines typically store secrets in either the source code (for example, web.xml, appsettings.json files from Spring Boot, or ASP.NET Core) or inside the integration or build servers (for example, GitLab, Azure DevOps Server, or the hosting environment). For instance, in this Azure App Service, the connection strings and API keys are stored in the hosting environment:
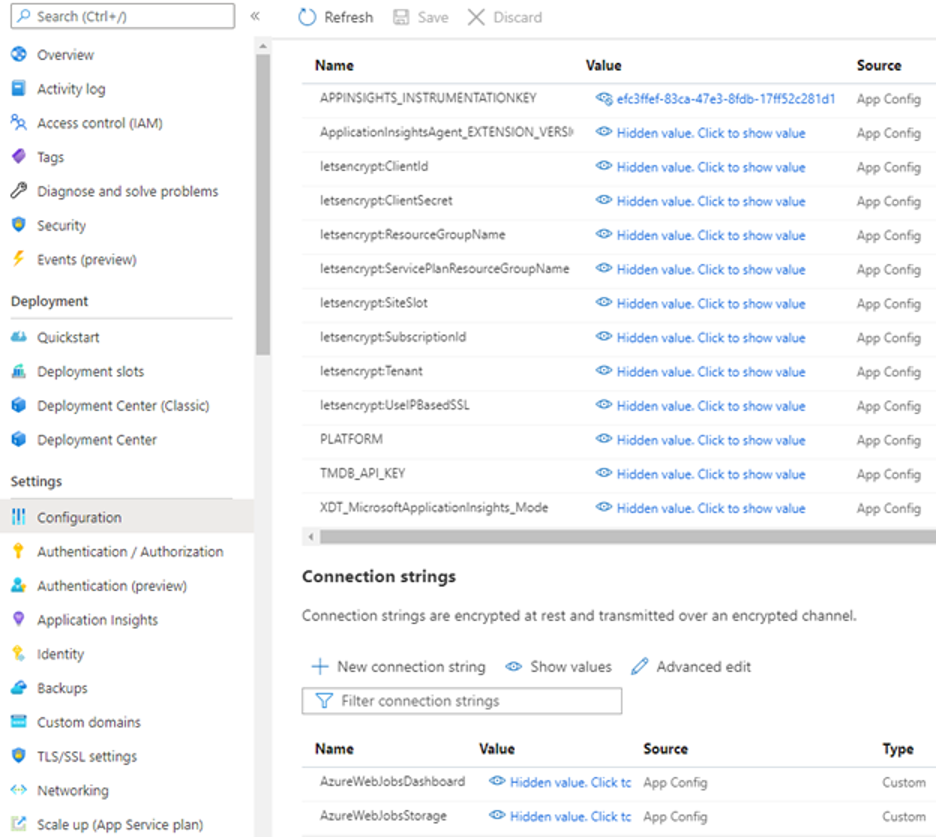
By the time you obfuscate or hide the secrets, it is already too late. Anyone with access to these tools and software can access the secrets and read their values. The same applies to your build servers if you use deployment command-line interfaces (CLIs) such as Azure CLI or AWS Toolkit. Your secrets and API tokens may not be logged on the terminal, but they are always available inside the tool. Users with access to the resource can extract those secrets
These secrets are not limited to API keys. They can also be connection strings to production databases, telemetry collection services, deployment keys, and more. Storing secrets inside the process or tool is simply not secure and does not make for the best DevSecOps.
CyberArk Conjur helps minimize the attack surface by removing secrets from these tools and storing them in secure enclaves. Users only gain access to Conjur and secrets if the requesting process can verify their identity, including but not limited to the hosting environment, machine identities, tokens, and certificates. Let’s walk through how to use Conjur to protect secrets in Jenkins, improving DevOps security.
Set up Jenkins and CyberArk Conjur
First, set up Jenkins and CyberArk Conjur installations for your environment, if you have not done so already. Follow the official documentation to set up the instances:
- Set up CyberArk Conjur and install OSS CLI.
- Install Jenkins or use Docker-based
Add Secrets
We can add secrets to our Conjur instance using OSS CLI. These will then be exposed to our Jenkins installations.
Start by storing a small piece of secret in your instance to capture and showcase it in Jenkins. Before creating a secret, add Jenkins hosts in Conjur using a policy. To learn how to declare this, visit the official documentation. The Conjur configuration offers more features you can use and you can add, update, or remove secrets from the system using the policies.
Either use the root policy or create a new policy for Jenkins. We create secrets for the policy and deploy them to our root policy in the next steps:
# Create a hello world secret
- &secret_variables
  - !variable secret_message
# Now, create a secret group and permission
- !group jenkins-only
- !permit
  resource: *secret_variables
  privileges: [ read, execute ]
  roles: !group jenkins-only
This policy assumes you have defined the roles and assigned them to your Conjur instance. In our policy, we have:
- A variable named “secret_message” that can be passed to our Jenkins pipeline.
- A group named “jenkins-only” that will access secrets in our Jenkins pipeline.
- Read and execute permissions assigned, so this group can maintain secrets and read them in the Jenkins pipeline.
By the time we execute the policy, Conjur will contain a placeholder for a secret that the “jenkins-only” group can read.
We can now securely deploy this variable’s value in our Conjur instance using the CLI:
conjur policy load <policy-name> <secrets-file-name>
Now that our policy and secrets are in the vault, we can supply passwords from our terminal safely and securely. Note that you can always generate random values. The simplest way to supply the value to our secret_message secret is:
conjur variable values add jenkins-group/secret_message your_secret_or_random_value
You can change the policy and variable names as well as the variable value in your environment. This will set up the variable on CyberArk Conjur.
The next step is to request these variables from our Jenkins environment.
Note: Before you access the CyberArk Conjur instance from a Jenkins installation, you need to configure the access certificate. For more details, review Configuration of Jenkins and CyberArk Conjur.
When your CyberArk Conjur plugin tries to connect to your Conjur instance, it will validate whether the request is coming from the authentic Jenkins server. If the requesting server cannot prove its validity (via the certificate), then Conjur automatically denies the request. This extra layer of security helps prevent access to secrets, even in cases where someone has access to passwords or connections to the Conjur installation. Read the note under Configure Jenkins-Conjur connection to learn what happens behind the scenes.
Consume Secrets in Jenkins
To consume secrets in our jobs, we install the Conjur plugin in the system and connect it. The Conjur plugin for Jenkins is open source and available to download from GitHub. Download the Conjur.hpi file and upload the plugin to the Jenkins server.
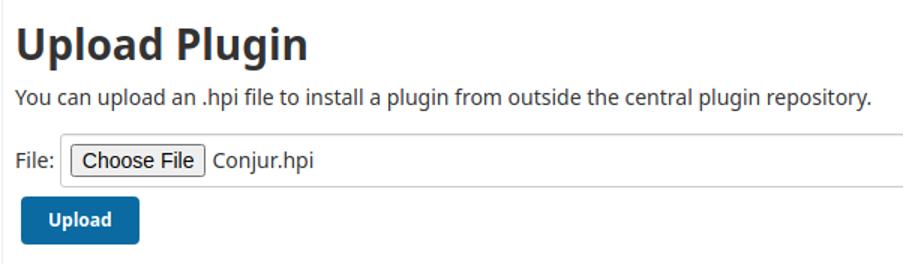
After installation, restart your Jenkins server. You can then find the plugin listed in Plugins:

To better understand the integration of Jenkins and Conjur, review the API reference. To learn more about how this works internally, you can also view the Java code for the binding.
When we have Conjur installed in Jenkins, we can reuse it in several ways:
- Supply secrets to our continuous integration (CI) pipelines.
- Expose secrets to the Jenkins environment for use by other processes and plugins.
- Provide environment or team-specific secrets and credentials to the pipelines.
Now, we configure the Jenkins server and supply credentials to be used by the Conjur plugin. Visit the global credentials for the Jenkins instance and add the details for your specific policies.
This plugin exposes two utility functions to engage the Conjur plugin in Jenkins, requesting the passwords and providing them in Jenkins.
- withCredentials
- conjurSecretCredential
You can create a basic Hello World stage in your pipeline:
pipeline {
  agent any
  stages {

stage('Hello World') {
  steps {
    withCredentials([
      conjurSecretCredential(
        credentialsId: 'myCreds',
        variable: 'secret_message'
      )
    ]) {
      echo $secret_message
    }
   }
  }
 }
}
Here, we use the default Hello World template from the Jenkins pipeline script. Then, we add the withCredentials and conjurSecretCredential helpers to request credentials from our secure vault.
Before we run the job, we need to pull secrets from Conjur in the Jenkins environment. To configure Jenkins for that, open Jenkins Credentials and add the secrets as Credential in global scope (you can also limit their scope in the settings). See the screenshot below:
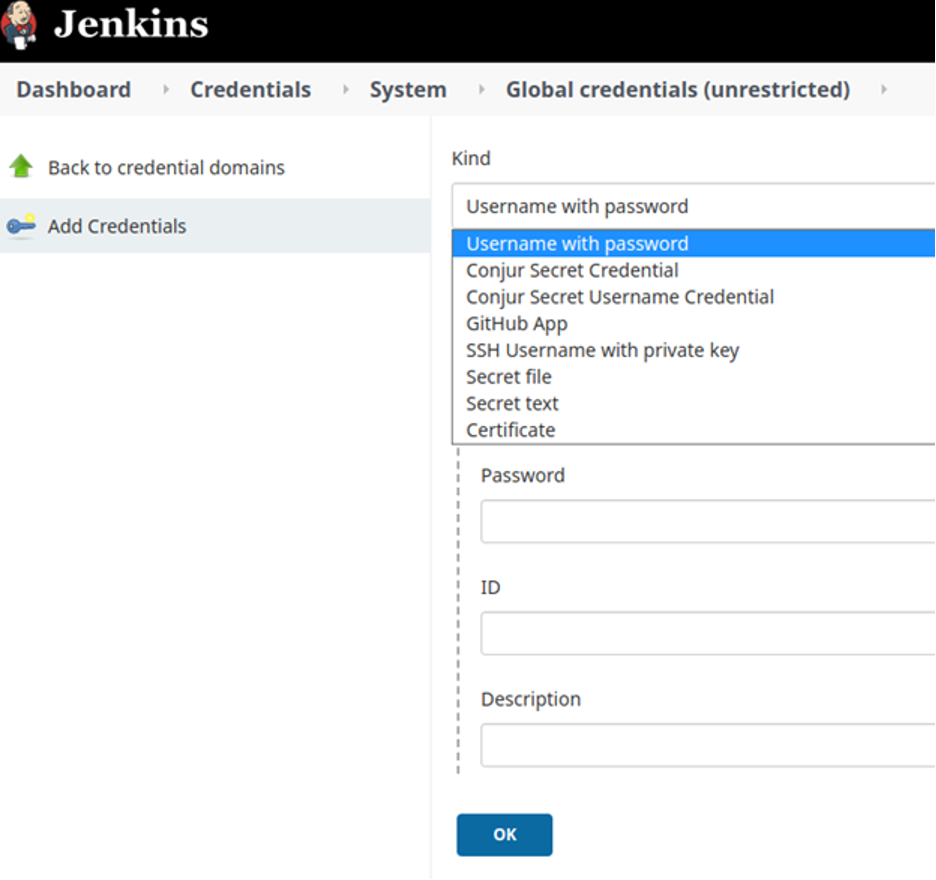
Select Conjur Secret Credential, then add values for the secret that Jenkins will pull from Conjur:
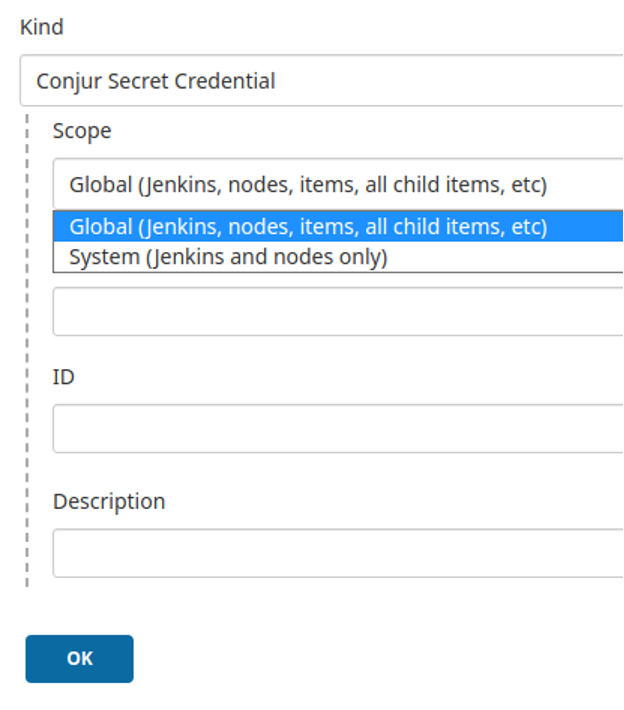
You can change the scope of this secret and add a Jenkins ID to capture secrets. When we run this job, we should see the secret we deployed to our Conjur instance.
The closest built-in Jenkins feature to this is the withEnv method. However, in that method, you either hardcode the values or read the values directly from Jenkins, which is not as secure as using Conjur.
Next Steps
In this article, we discussed the basic requirements, and benefits, of DevSecOps and securing the entire DevOps pipeline. As Jenkins makes it easy for you to build applications, layering Conjur on top makes your server more secure.
Unlike hardcoded and environment-embedded providers, CyberArk Conjur enables IT and DevSecOps teams to provision secrets. They can revoke access at any time and rotate secrets without leaving traces in Jenkins. To understand the problem of logging variables in the system to be read by anyone in IT, watch this CICD demo.
Now that you understand more about the importance of DevOps security, and how to secure Jenkins using Conjur, you can use this knowledge to reach the next level of DevSecOps maturity in your own environment.
For more inspiration about what you can do with Conjur, explore the open-source repository of CyberArk Conjur plugin for Jenkins on GitHub. Visit the CyberArk Conjur website to learn how Conjur is helping increase product security and compliance, explore the Securing Jenkins Freestyle project using Conjur, and join our DevOps community for more help and inspiration.
Joe Garcia is a DevOps Security Engineer with CyberArk. As CyberArk’s automation expert, he enjoys sharing his knowledge with the community through conferences, workshops, videos, and this blog. When not sharing, Joe enjoys learning and tinkering on cutting edge technologies to get ahead of the next big tech wave. Be sure to follow him on Twitter at @Joe_Garcia to see where he’ll end up next.