
Editor’s Note: Please be aware that K3 is not officially supported on Conjur and the contents of this tutorial are provided as is and without warranty.
The Internet of things (IoT) and intelligent edge devices often communicate with external web services or databases. As these devices can control critical manufacturing or monitoring sites, developers must secure them properly. Specifically, developers must avoid storing hard-coded sensitive data (like database passwords or API keys) in the source control systems.
CyberArk Conjur helps developers avoid storing sensitive data in the source control. Conjur integrates with many popular tools, including Ansible, AWS, and Kubernetes. Specifically, the latter enables securing the containerized workloads.
Containerization and Kubernetes play an essential role in IoT because they allow you to deploy cloned software to many devices quickly and remotely. K3s provides lightweight Kubernetes tailored for IoT and intelligent edge devices.
This tutorial shows how to install Conjur in K3s and deploy the sample pet-store application. The application fetches the Conjur server’s database credentials to connect to the PostgreSQL database securely.
All the companion files used in this tutorial are here.
Please confirm Docker is installed on the machine if docker has not been installed please execute:
apt install docker.io
K3s
Start by installing the K3s cluster. You can find the general installation instructions here. Eventually, you can use the instructions for your specific Linux distribution. Here is the detailed tutorial for Ubuntu 20.04. To confirm your installation use:
k3s kubectl get nodes

After setting up the K3s cluster, install Helm. We use Helm to install Conjur in the K3s cluster. Then configure the KUBECONFIG variable:
export KUBECONFIG=/etc/rancher/k3s/k3s.yaml
Conjur
To install Conjur, start by creating two namespaces, conjur-server and testapp:
kubectl create ns conjur-server
kubectl create ns testapp
Using the referenced repository, create the Kubernetes role binding:
kubectl apply -f conjur/01_role-binding.yaml
Then, install Conjur using Helm:
helm repo add cyberark https://cyberark.github.io/helm-charts
helm repo update
helm install conjur-cluster cyberark/conjur-oss \
     --set ssl.hostname=conjur.demo.com,dataKey="$(docker run --rm cyberark/conjur data-key generate)",authenticators="authn-k8s/dev" \
     --set postgres.persistentVolume.create=false \
     --set service.external.enabled=false \
     --namespace conjur-server
You see the output below:
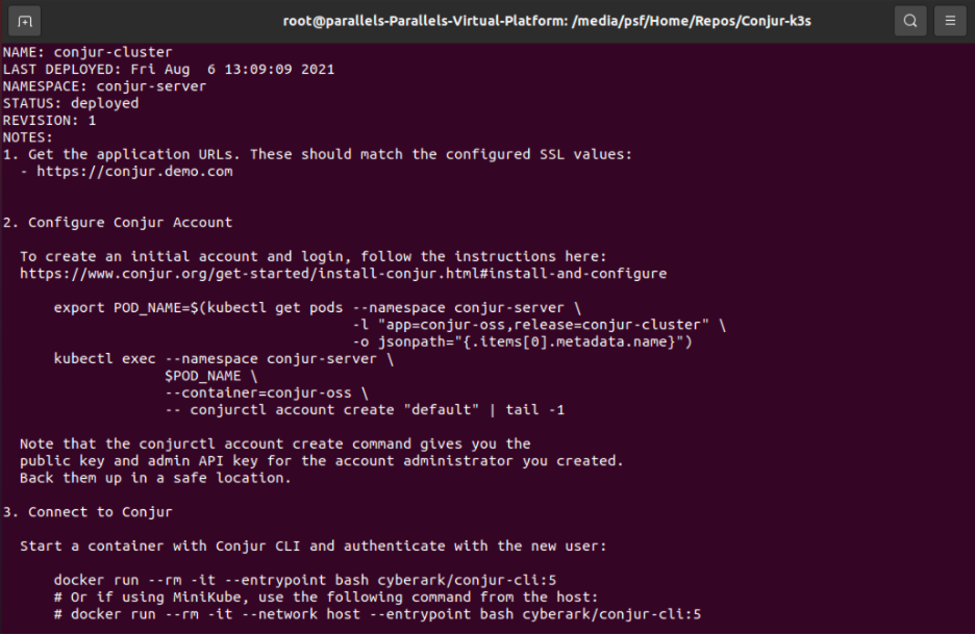
The output basically tells you what to do next. So, follow the instructions, and configure the “default” Conjur account:
export POD_NAME=$(kubectl get pods --namespace conjur-server \
-l "app=conjur-oss,release=conjur-cluster" \
-o jsonpath="{.items[0].metadata.name}")
kubectl exec --namespace conjur-server \
$POD_NAME \
--container=conjur-oss \
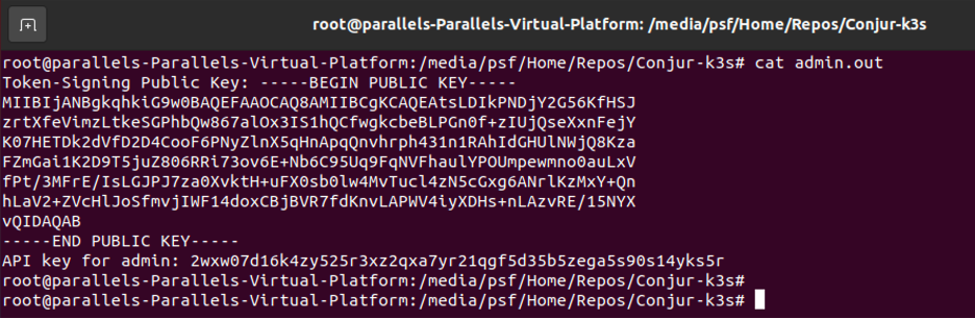
-- conjurctl account create "default" | tee admin.out
This produces the admin.out file, containing the public key and API key for the admin user:
Finally, configure the fully qualified domain name (FQDN) conjur.demo.com:
export CONJUR_URL=$(kubectl describe svc conjur-cluster-conjur-oss -n conjur-server |grep Endpoints | awk '{print $2}')
export SERVICE_IP=$(echo $CONJUR_URL | awk  -F ':' '{print $1}')
echo "$SERVICE_IP conjur.demo.com" >> /etc/hosts
Conjur Client
After configuring the Conjur server, we need to configure the Conjur Client. The process is three steps, in which we first set up the alias for the Conjur command-line interface (Conjur CLI), initialize Conjur CLI, and then reset the admin password, which we use to log in.
Enter the following command to set up the Conjur CLI (assuming CONJUR_URL and SERVICE_IP environmental variables are set as in the previous section):
alias conjur='docker run --rm -it --add-host conjur.demo.com:$SERVICE_IP -v $(pwd):/root cyberark/conjur-cli:5 '
To initialize Conjur CLI, use the conjur.demo.com domain and the default Conjur account:
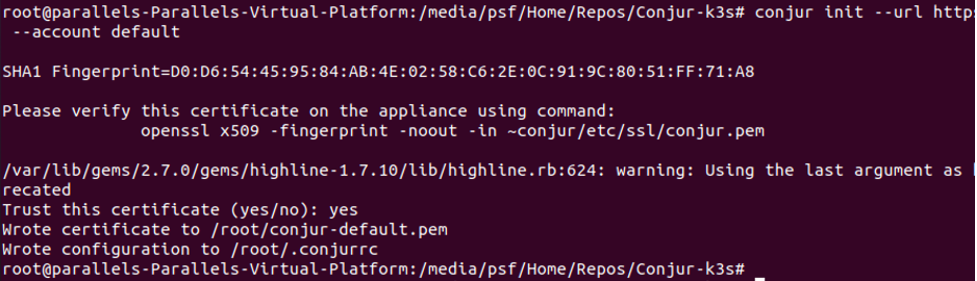
conjur init --url https://conjur.demo.com:9443 --account default
The output looks as follows:
Last, log in and reset the admin password to “MySecretP@ss1”
conjur authn login -u admin -p $(grep admin admin.out | cut -c20-)

conjur user update_password -p MySecretP@ss1

conjur authn logout && conjur authn login -u admin
Kubernetes Authenticator
We can now enable the Kubernetes authenticator. The authenticator communicates with the Conjur server and enables the enrolled applications to fetch secrets from Conjur. When setting up the authenticator, you need the following information:
- Conjur account: default.
- Authenticator identifier: dev
- Kubernetes namespace, in which you deploy the application: testapp.
- The service account for the application, which Conjur uses for authentication: testapp-secure-sa.
- The name of the container running the authenticator client: secretless
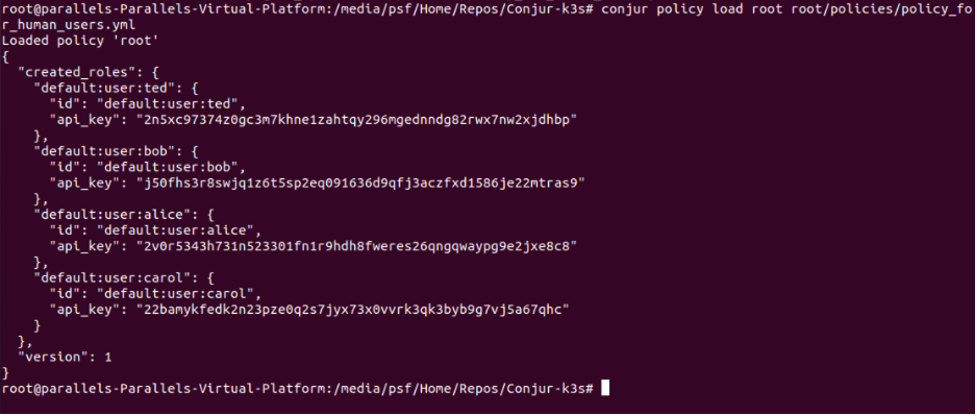
Start by applying the default policies. You can find all of them in the policies subfolder of the referenced repository:
conjur policy load root root/policies/policy_for_human_users.yml
conjur policy load root root/policies/policy_for_authenticator_identities.yml
conjur policy load root root/policies/policy_for_k8s_authenticator_service.yml
Here is the sample output you get after invoking the first command:
After applying other policies, the output is similar.
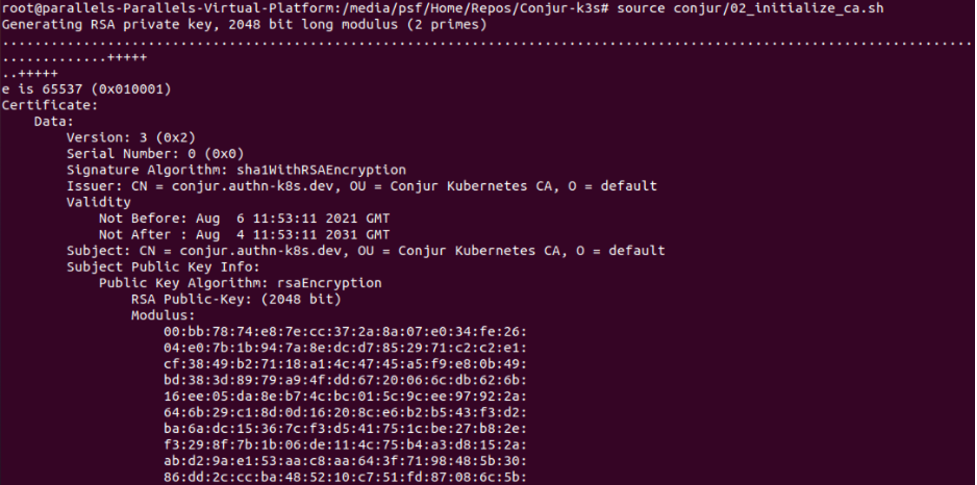
Afterward, you must initialize the CA certificate and key. The policy for Kubernetes authenticator requires this. Use the conjur/02_initialize_ca.sh script:
source conjur/02_initialize_ca.sh
Here is what you see after invoking the command:
Enrolling an Application
We are now ready to enroll the application. We use the sample pet-store app, the Java application, which exposes the REST API and uses the PostgreSQL database. The app communicates with the database using credentials stored in the following environmental variables:
- DB_URL
- DB_USERNAME
- DB_PASSWORD
- DB_PLATFORM
When working with Conjur, the application fetches the username and password from the corresponding Conjur secrets: app/testapp/password and app/testapp/username. The URL depends on two other secrets: app/testapp/secret/host and app/testapp/secret/port. By default, the platform is set to postgres.
First, set up the Conjur policy for the application. The policy contains four variables for storing the above secrets:
- !policy
  id: app/testapp
  owner: !group kube_admin
  annotations:
    description: This policy contains the creds to access the DB creds in conjur

body:
  - &variables
    - !variable secret/host
    - !variable secret/port
    - !variable secret/username
    - !variable secret/password

  - !layer layer

  - !permit
    resource: *variables
    privileges: [ read, execute ]
    roles: !layer layer
You can find the above policy in the companion code. Load it using the following command:
conjur policy load root root/policies/testapp-policy.yml
Then, add values for the four secrets using the following commands:
conjur variable values add app/testapp/secret/password "5b3e5f75cb3cdc725fe40318"
conjur variable values add app/testapp/secret/username "test_app"
conjur variable values add app/testapp/secret/host "testapp-db.testapp.svc.cluster.local"
conjur variable values add app/testapp/secret/port "5432"
Note that the database username and password must match the POSTGRES_USER and POSTGRES_PASSWORD environmental variables, which we use later during application deployment.
Now add the application to the Conjur policy:
conjur policy load root root/policies/app-policy.yml
Then, grant the Conjur instance access to pods running in the K3s cluster:
kubectl create -f conjur/03_conjur-authenticator-role.yml
Last, store the Conjur SSL certificate in the Kubernetes ConfigMap:
kubectl -n testapp create configmap conjur-cert --from-file=ssl-certificate="conjur-default.pem"
The certificate is in conjur-default.pem during Conjur initialization. The authenticator pod uses this certificate for authentication by the Conjur server.
In the last step, configure the Secrets Provider for PostgreSQL:
kubectl -n testapp create configmap secretless-config --from-file=./secretless/secretless.yml
The Secrets Provider mounts this file to the Conjur authenticator pod’s volume.
Deploying the App and Fetching Secrets
Start by deploying the PostgreSQL database using the app/01_db.yml manifest file:
kubectl apply -f app/01_db.yml
The file deploys the database, and sets its credentials using environmental variables (see app/01_db.yml):
env:
  - name: POSTGRES_PASSWORD
    value: 5b3e5f75cb3cdc725fe40318
  - name: POSTGRES_DB
    value: test_app
  - name: POSTGRES_USER
    value: test_app
Verify the pod is running:
kubectl -n testapp get pods
Then, deploy the pet-store application using app/02_pet-store.yml manifest:
kubectl apply -f app/02_pet-store.yml
The above command deploys two containers, one with the app, and the second one with Conjur authenticator. Verify that both are running:
kubectl -n testapp get pods

This means the application fetched the secrets from Conjur, and used them to connect to PostgreSQL. If so, obtain the application URL:
export URL=$(kubectl describe service testapp-secure -n=testapp |grep Endpoints | awk '{print $2}' )
Add some data to the pet endpoint,
curl -d "{\"name\": \"my-pet\"}" -H "Content-Type: application/json" $URL/pet
Check to see if it is there:
curl $URL/pet/1
The command returns the JSON with pet info:

Deploying to the IoT and Edge Devices
All the steps presented above were cloud-native, meaning that we dealt with containerized workloads. The only platform-specific procedure was the installation of K3s. So, if you want to apply this to your device, just ensure you follow the appropriate tutorial for deploying K3s to your Linux distribution.
Summary
In summary, we learned how to deploy a K3s cluster and set up the Conjur server in the cluster. We configured the Conjur server to store sensitive database connection credentials, which our application automatically fetched to securely connect to the database. By doing so we avoid storing sensitive data in the source control system, which has become essential for modern IoT and intelligent edge app development.