
Managing cloud infrastructure isn’t a simple task at the best of times. From initial provisioning and configuration to maintenance and scaling, there are dozens, if not hundreds, of things to keep us occupied. Infrastructure as code (IaC) tools such as Terraform simplify this task immensely — they provide a way to centralize your infrastructure configuration that can evolve as your systems grow.
However, one problem not solved out of the box by most IaC tools is secrets management. By secrets, we mean any sensitive data necessary for the functioning of your infrastructure, but that shouldn’t be common knowledge to everyone working on that infrastructure’s configuration. A secret could be anything from default passwords for databases, sensitive information such as public keys, and so on.
Security best practices tell us that we shouldn’t store secrets in our configuration code. This practice is especially true if we want to take advantage of one of the significant benefits of IaC: the ability to manage configuration files collaboratively with a team of developers.
Conjur is an excellent solution to this problem, offering isolation between the secrets needed to run our infrastructure from the code that provisions and configures it. Conjur integrates with Terraform using the Terraform provider for Conjur, terraform-provider-conjur, making it easy to use Conjur-stored secrets within our configuration.
Terraform, AWS, and Conjur
To highlight the benefits of integrating Conjur with IaC tooling, we’re going to use Terraform to provision a few AWS resources. Specifically, we’ll create a virtual private cloud (VPC) and launch an Aurora database and a cluster of EC2 instances within the VPC. The database instance won’t be publicly accessible but will allow connections from the EC2 instances. Next, we’ll use Conjur to store some secrets that we want to use with these resources. Then we’ll store the root password for our Aurora databases, plus our public key so that we can use SSH to log on to any EC2 instance.
We’re using Conjur Open Source Suite running in Docker, as outlined in the quick start guide, but this demo can work with Conjur Enterprise as well.
There are some prerequisites for this demo:
- Check out Terraform’s tutorial on installing Terraform CLI here.
- Sign up for a free AWS account on the AWS home page.
The Conjur manifest we’ll use for this demo is below. It creates two policies, one for our Aurora database and one for our EC2 instances, each with a single variable. It also defines a host called adminHost, which we use in our Terraform configuration.
- !policy
  id: all-hosts

  body:
  - !host terraformHost

- !policy
  id: db
  body:
  - !variable password

  - !permit
    resource: !variable password
    privileges: [ read, execute ]
    roles: !host /all-hosts/terraformHost

- !policy
  id: ec2
  body:
  - !variable publicKey

  - !permit
    resource: !variable publicKey
    privileges: [ read, execute ]
    roles: !host /all-hosts/terraformHost
First, we create a file called conjur.yml and paste the code into it. To load this policy into Conjur, we use the following command:
$ conjur policy load root conjur.yml
Once we’ve loaded the policy into Conjur, it’s time to create and store the secrets we’ll need for our Terraform manifest. Now, we’ll run the following commands to generate a random root password for our Aurora database and store it in Conjur:
 $ dbpass=$(openssl rand -hex 12 | tr -d '\r\n')
 $ conjur variable values add db/password ${dbpass}
Next, we must generate a public key for use in our EC2 instances by running the following command:
$ ssh-keygen -m PEM
When prompted, we’ll want to store the key in a non-default location, such as ~/.ssh/aws-key.pem. If we don’t provide a custom location to store the key, we run the risk of overwriting our default SSH key!
Next, we’ll store the public key in Conjur:
 $ publickey=$(cat ~/.ssh/aws-key.pem.pub)
 $ conjur variable values add ec2/publicKey ${publickey}
That’s all we need to do with Conjur for now. Terraform takes care of retrieving the secrets themselves! But before we get to that, we must install the Conjur Terraform Provider. The Provider’s repository is here, including the installation instructions.
One important note: If you are using Terraform 1.0.0, the path of the provider should be :
~/.terraform.d/plugins/local/cyberark/conjur/VERSION/TARGET
VERSION is the version of the plugin (0.5.0 at the time of writing), and TARGET is the target architecture, for example, darwin_amd64 for Intel-based Macs. See Terraform’s documentation on Provider Installation for more information.
Now it’s time to create our Terraform manifest file by running the following commands:
 $ mkdir terraform-conjur-aws && cd terraform-conjur-aws
 $ touch main.tf
We open main.tf in a code editor and add the following:
terraform {
  required_providers {
    conjur = {
      source  = "local/cyberark/conjur"
      version = "0.5.0"
    }
  }
}

variable "conjur_api_key" {}

provider "conjur" {
  appliance_url = <CONJUR-URL>
  account = <CONJUR-ACCOUNT-NAME>
  login = "host/all-hosts/terraformHost"
    api_key = var.conjur_api_key
  ssl_cert_path = <PATH-TO-CERT>
}

data "conjur_secret" "db_root_password" {
  name = "db/password"
}

data "conjur_secret" "public_key" {
  name = "ec2/publicKey"
}
Inside the previous code block, you need to replace all values inside <> with the actual values. For example, when building with the Conjur OSS Quick Start instructions, the configuration looks like this:
provider "conjur" {
  appliance_url = "https://localhost:8443"
  account = "myConjurAccount"
  login = "host/all-hosts/terraformHost"
  api_key = var.conjur_api_key
  ssl_cert_path = "../conjur-quickstart/conf/tls/nginx.crt"
}
The Provider uses the conjur_api_key variable to connect to the Conjur instance, and the two data blocks grab the secrets stored in Conjur, which we’ll need later in our Terraform file.
For now, it’s time to initialize and test the configuration by running the following commands:
$ export TF_VAR_conjur_api_key="<Conjur API key for terraformHost>"
$ terraform init
$ terraform apply
If Terraform prompts “Do you want to perform these actions? Enter a value:”, answer “yes”
The plan should run, and we should see the following response:
Apply complete! Resources: 0 added, 0 changed, 0 destroyed.
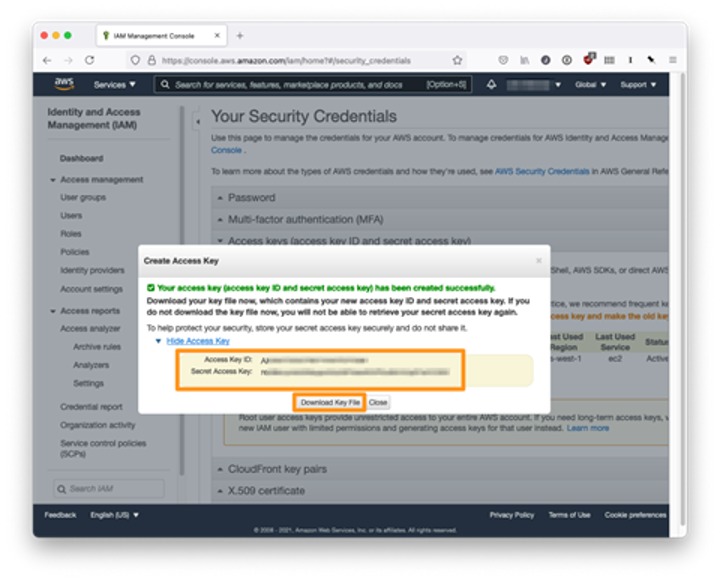
Next, we must connect our Terraform configuration with AWS. To start, we’ll need to go to the AWS Console and create AWS access keys for use by the Provider. Then, on the AWS Security Credentials page, we click Create New Access Key under “Access keys (access key ID and secret access key).”
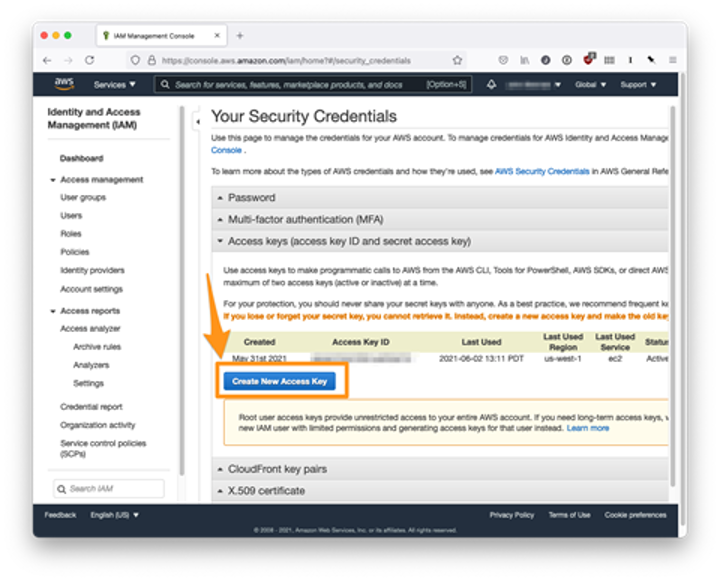
Now we copy both the access key ID and the secret access key. So it’s also good to save the key file locally.
The Terraform AWS Provider picks up access keys in our command-line environment automatically, so we run the following before continuing:
 $ export AWS_ACCESS_KEY_ID="<YOUR ACCESS KEY ID>"
 $ export AWS_SECRET_ACCESS_KEY="<YOUR SECRET ACCESS KEY>"
Then, back in our main.tf file, we add the following:
locals {
  name   = "terraform-conjur"
  region = "us-west-1"
  tags = {
    Terraform   = "true"
    Environment = "dev"
  }
}

provider "aws" {
region = local.region
}

module "vpc" {
  source  = "terraform-aws-modules/vpc/aws"
  version = "~> 3.0"

  name = local.name
  cidr = "10.0.0.0/16"

  azs              = ["${local.region}a", "${local.region}b"]
  public_subnets   = ["10.0.0.0/24", "10.0.1.0/24"]
  database_subnets = ["10.0.3.0/24", "10.0.4.0/24"]

  default_vpc_enable_dns_hostnames = true

  tags = local.tags
}
The locals block allows us to reuse repeated configuration options like AWS regions and tags, and the aws provider block tells Terraform that we’ll be working with AWS resources.
The vpc module block is the first real piece of infrastructure configuration we’re creating. It defines a virtual private cloud within which we’ll be launching our Aurora and EC2 instances.
Next, we’ll define our Aurora instance itself.
resource "aws_db_parameter_group" "example" {
  name        = "${local.name}-aurora-db-postgres11-parameter-group"
  family      = "aurora-postgresql11"
  description = "${local.name}-aurora-db-postgres11-parameter-group"
  tags        = local.tags
}

resource "aws_rds_cluster_parameter_group" "example" {
  name        = "${local.name}-aurora-postgres11-cluster-parameter-group"
  family      = "aurora-postgresql11"
  description = "${local.name}-aurora-postgres11-cluster-parameter-group"
  tags        = local.tags
}

module "rds-aurora" {
  source  = "terraform-aws-modules/rds-aurora/aws"
  version = "5.2.0"

  name                  = local.name
  engine                = "aurora-postgresql"
  engine_version        = "11.9"
  instance_type         = "db.r4.large"
  instance_type_replica = "db.t3.medium"

  vpc_id                = module.vpc.vpc_id
  db_subnet_group_name  = module.vpc.database_subnet_group_name
  create_security_group = true
  allowed_cidr_blocks   = module.vpc.public_subnets_cidr_blocks

  replica_count                       = 2
  iam_database_authentication_enabled = false
  password                            = "${data.conjur_secret.db_root_password.value}"
  create_random_password              = false

  apply_immediately   = true
  skip_final_snapshot = true

  db_parameter_group_name         = aws_db_parameter_group.example.id
  db_cluster_parameter_group_name = aws_rds_cluster_parameter_group.example.id
  enabled_cloudwatch_logs_exports = ["postgresql"]

  tags = local.tags
}
Most of the inputs here are specific to Aurora and beyond the scope of this tutorial, but the rds-aurora documentation covers them in more detail. In short, we’re defining a Postgres database with two replicas. In addition, we’re setting the password for the root user on every database to the DB root password we’ve stored in Conjur. As mentioned earlier, the databases live on a database-specific subnet, so only resources on another subnet in the VPC can access it.
Here, we can start to see the value of using Conjur with Terraform. As our infrastructure evolves, for example, if we need to create more replicas, secrets can be applied or reused without the infrastructure engineer ever needing to know what they are.
Lastly, we’ll create a cluster of EC2 instances that connect to our databases. We need some more boilerplate code to set our Amazon machine images (AMI). Then we need to create a security group for the VPC that allows SSH and HTTP connections to the EC2 instances:
data "aws_ami" "amazon_linux" {
  most_recent = true
  owners = ["amazon"]

  filter {
    name = "name"
    values = [
      "amzn-ami-hvm-*-x86_64-gp2",
    ]
  }

  filter {
    name = "owner-alias"
    values = [
      "amazon",
    ]
  }
}

module "security_group" {
  source  = "terraform-aws-modules/security-group/aws"
  version = "~> 4.0"

  name        = "example"
  description = "Security group for example usage with EC2 instance"
  vpc_id      = module.vpc.vpc_id

  ingress_cidr_blocks = ["0.0.0.0/0"]
  ingress_rules       = ["http-80-tcp", "all-icmp", "ssh-tcp"]
  egress_rules        = ["all-all"]
}
We also want every EC2 instance to come pre-loaded with our public key stored in Conjur. To accomplish this, we first need an aws_key_pair resource:
resource "aws_key_pair" "key_pair" {
  key_name = "ssh-key"
  public_key = "${data.conjur_secret.public_key.value}"
}
Finally, here’s the configuration to spin up our cluster. Note that the key_name attribute connects the public key to our EC2 instances.
module "ec2_cluster" {
  source  = "terraform-aws-modules/ec2-instance/aws"
  version = "2.19.0"

  instance_count = 5

  name = "my-cluster"
  ami = data.aws_ami.amazon_linux.id

  instance_type = "t2.nano"
  vpc_security_group_ids = [module.security_group.security_group_id]
  subnet_ids = module.vpc.public_subnets
  tags = local.tags
  key_name = "${aws_key_pair.key_pair.key_name}"
}

output "aurora_instance_private_address" {
  value = module.rds-aurora.rds_cluster_endpoint
}

output "ec2_addresses" {
  value = module.ec2_cluster.public_ip
}
We’re also setting two output values. When we apply our Terraform configuration, the plan will output the address of our Aurora DB and the public IP addresses of our EC2 instances.
All that’s left now is to run terraform init & terraform apply, and wait! The plan will take a few minutes to execute, and we should see the following once complete:
Apply complete! Resources: 34 added, 0 changed, 0 destroyed.
To ensure that everything’s working as expected, we can run the following:
ssh -i ~/.ssh/aws-key.pem ec2-user@<IP ADDRESS>
The IP address is any EC2 instance address listed in the Terraform output.
Once connected to the instance, we can test the connection to the Aurora cluster using netcat:
nc -zv <AURORA ADDRESS> 5432
This is the address appears as part of the Terraform plan’s output.
We should see the following:
Connection to <AURORA CLUSTER ADDRESS> 5432 port [tcp/postgres] succeeded!
Success! We’ve spun up our AWS infrastructure in less than 200 lines of Terraform configuration, and thanks to Conjur, our secrets are both secure and easily accessible as we build and scale our resources.
Conclusion
This demo highlights the benefits and simplicity of using Conjur within Terraform’s IaC paradigm. Additionally, secrets storage goes beyond passwords and keys. Any sensitive information that’s an essential part of our infrastructure can be stored in Conjur and used as part of our Terraform configuration.
Conjur can also help augment existing Terraform configurations by adding the Provider and replacing hard-coded values with those pulled from Conjur.
To try it yourself today, follow the quick start instructions to get the Conjur OSS running locally and give it a try!

Quincy Cheng, DevOps Evangelist, Asia Pacific & Japan, CyberArk