
The recent SolarWinds breach prompted many organizations to take a hard look at their current cybersecurity practices, and get back to the basics to strengthen defenses.
One foundational best practice is to harden servers against cyber attacks, as threat actors often target them to gain access to critical business systems, disrupt service or steal confidential information. This is a critical step for protecting your security applications – particularly your CyberArk Privileged Access Management deployment, which manages your organization’s most sensitive assets and information.
Of course, hardening your servers isn’t always a simple task. In some cases, Privileged Access Management implementations comprise numerous servers – all of which require specific hardening requirements that must be tracked and managed.
We’ve introduced an open source scanning tool – CyberArk Hardening Health Check – to simplify this process and help organizations apply the highest levels of protection to all of these highly sensitive systems.
Provided by our developer community, this free tool can be used to scan all CyberArk component servers to quickly identify misconfigurations and other hardening issues so they can be remediated.
But don’t stop there – our new scanning tool is built based on industry best practices and can be used for “health checks” on any server within your environment.
And as a CyberArk expert within your organization, we value your feedback and encourage you to interact with the growing CyberArk Commons community to continuously expand on this valuable open source tool.
In this time of social distancing, keeping safe and healthy is more important than ever, but your Privileged Access Management servers needs to stay healthy too, just in different ways. For some time now, there are best practices for hardening CyberArk PAM servers, but customers also need to check that these best practices are followed and applied on all servers. The good news is that you can now freely use a tool for scanning CyberArk component servers for hardening issues or misconfigurations, made available to our developer community to be used as you wish or to improve as you see fit.
Core PAS implementations could include a lot of servers, and each of these servers should be hardened based on the best practices relevant to the CyberArk components installed on it
But where each component has some specific hardening requirements things might get a bit hard to track and manage.
Since there is no vaccine for vulnerable servers, we need to do our best and verify that our servers are properly hardened and secure.
What Is the CyberArk Hardening Health Check Tool?
This tool is based on automated hardening scripts provided by CyberArk, and will allow you, as a CyberArk customer, to verify if a server is hardened based on CyberArk best practices.
The tool is based on the same hardening XML that comes with the automated hardening scripts and allows to disable some of the checks as well. What this means is that if you disabled a specific hardening step, you can disable the same one in the hardening health check to prevent false positives.
This tool can automatically detect all installed components and run their relevant hardening checks, whether you have one component installed (like the CyberArk Digital Vault) or multiple on the same server (like a Central Policy Manager and a CyberArk Privileged Session Manager).
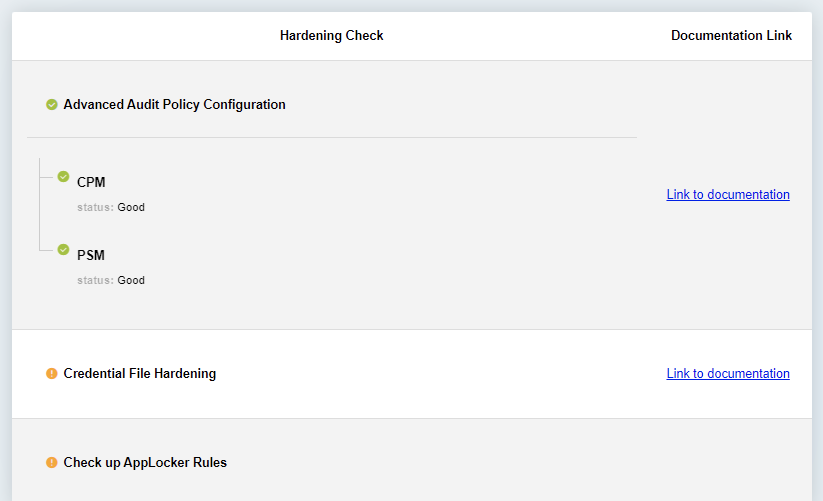
The tool provides a simple way to report on hardening steps, and whether recommendations were implemented fully or partially. Additionally, it includes a detailed report of all the checks performed for the relevant server, including relevant links to the hardening documentation.
How Do I Use the Tool?
The package ZIP includes a few folders, a PowerShell script (Main.ps1) and a HTML template for the report. Download the ZIP and extract it on the CyberArk component server you wish to check. Open PowerShell (as an administrator) and run the Main.ps1 script
For troubleshooting or to obtain more information about the checks performed, you can run the script using Verbose logging
The tool creates a log file by default that contains all steps taken by the script (when using Verbose logging you will get a lot more info in the log file). Other relevant information will be referenced in the log and the report.
Available Hardening Tests
- Check disabled services and unneeded server roles
- Check Vault NIC configuration hardening
- Check FIPS compliancy on CPM and PVWA
- Check PVWA IIS hardening
- Check components CredFile configurations
- And much more…
How Do I Get Started?
The project is fully extensible and all users are encouraged to contribute and add more hardening checks as needed.
So, go ahead and have a look on this new project at: https://github.com/cyberark/CYBRHardeningCheck
For any question or issues, feel free to open us a new issue at: https://github.com/cyberark/CYBRHardeningCheck/issues
To contribute more hardening checks and tests or learn more about these options, visit here: https://github.com/cyberark/CYBRHardeningCheck/blob/main/CONTRIBUTING.md
Compromising privileged accounts is a central objective for any attacker, and CyberArk solutions are designed to help improve your organization’s ability to control and monitor privileged activity and reduce risk. As with any security solution, it is essential to secure your CyberArk deployment to help ensure the controls you have implemented are not circumvented by an attacker. Hardening your CyberArk servers is the first of several fundamental security steps you should take to protect your deployment. Explore them all here.
And to learn about other CyberArk open source projects and security research, check out the CyberArk Commons Community.
Important note
This tool does not replace running the hardening procedures from CyberArk and cannot be taken as a guarantee for making sure the server is fully secured – it is always good to run your own security check up tools. Note that these settings are security best practices and the tool is provided “AS IS without warranty” for you to use and build on.

I am a senior product manager at CyberArk who loves solving customers’ problems, but I also love coding in my spare time.