Many organizations are now deploying their containerized applications in Kubernetes clusters to achieve highly available, automatically orchestrated solutions. Often, however, the challenge is to properly secure the application and go beyond the Kubernetes secrets and cloud provider-specific services.
This tutorial demonstrates how to retrieve sensitive information about a database connection in the Java Spring MVC application. The tutorial also uses a containerized application called Users that the PostgreSQL datastore supports.
Locate the companion code, Kubernetes manifest files, and Conjur files from this repository.
Creating the Application
To create the application, start with the Spring Initializr and select the following dependencies:
- Rest Repositories
- PostgreSQL Driver
Next, after creating the project, add the model, which represents a hypothetical user with three properties: id, userName, and age. See the full definition in src/main/java/conjur/models/User.java.
@Entity
@Table(name = "users")
public class User {
    @javax.persistence.Id
    @Id
    @GeneratedValue(strategy = GenerationType.AUTO)
    private Long id;

    @Column(name = "userName")
    private String userName;

    @Column(name = "age")
    private int age;

    // Getters and setters
    // ...
}
Now, create the UserRepository, based on the PagingAndSortingRepository in src/main/java/conjur/repositories/UserRepository.java.
@RepositoryRestResource
public interface UserRepository extends PagingAndSortingRepository<User, Long> {
}
The UserRepository is annotated with RepositoryRestResource in order to map the repository methods to REST controller endpoints automatically.
The last step is to provide the application settings by adding an application.yml file in the resources folder. This file configures the data source to connect to the PostgreSQL database as well as the server port at which the app listens:
spring:
  datasource:
    platform: postgres
    Url: jdbc:${DB_URL}
    username: ${DB_USERNAME}
    password: ${DB_PASSWORD}
   driver-class-name: org.postgresql.Driver
  jpa:
    generate-ddl: true
    hibernate:
    ddl-auto: update

server:
  port: 8080
Note that the URL, username, and password are the values of the corresponding environment variables named DB_URL, DB_USERNAME, and DB_PASSWORD. Using variables is the best approach when you want to configure the connection settings of containerized apps. To do so, provide the list of environmental variables and their values in the environment section of the Docker Compose file or the Kubernetes manifest file.
To test the app locally, you must have PostgreSQL and properly configured environmental variables (or values hardcoded in appsettings.yml). Here, we omit this step and focus only on containerization.
Containerization
Given the source code, create the following Dockerfile:
FROM maven:3.8.1-jdk-11-slim as maven
WORKDIR /app

# Copy pom.xml and uses it to install all the dependencies
COPY ./pom.xml ./pom.xml
RUN mvn verify clean --fail-never

# Copy the source and package the application
COPY ./src ./src
RUN mvn package && cp target/users-*.jar users.jar

# Prepare final image using runtime only
FROM openjdk:11-jre-slim

COPY --from=maven /app/users.jar /users.jar

ENTRYPOINT [ "java", "-jar", "/users.jar"]
The above file uses a Docker multi-stage build. First, it uses the base image with JDK to package the application with Maven. The output of this operation is named users.jar. Then, to reduce the size of the final image, the Dockerfile uses the base image with only JRE. It also uses this image to launch the users.jar file. See the ENTRYPOINT section of the Dockerfile shown above.
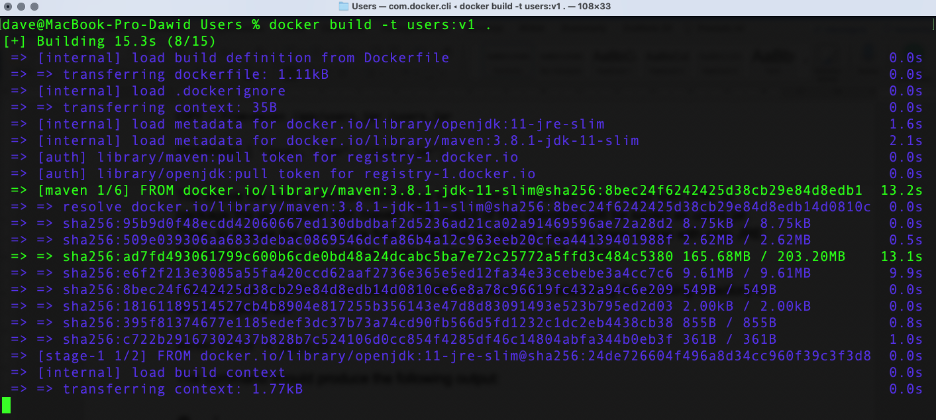
Now, we build the image using the following command, assuming that you set the working directory to the project’s file:
docker build -t users:v1 .
This command starts the build process with the following output:
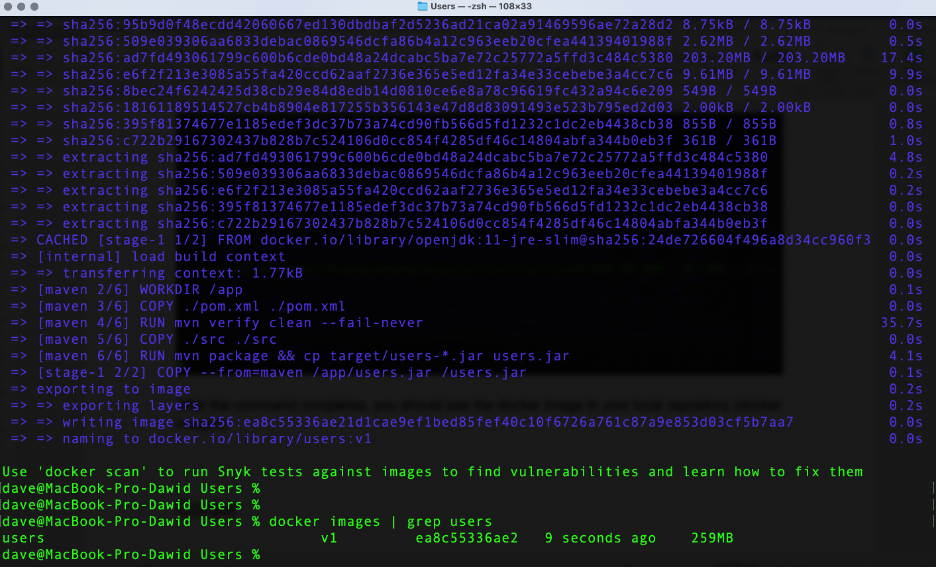
After the command completes, you see the Docker image in your local repository (docker images):
Kubernetes Manifests
After preparing the image, we must deploy the application and the underlying database system (PostgreSQL) to the Kubernetes cluster. The necessary manifest files are in the k8s folder. We test everything that you see here using the local cluster running within Docker Desktop.
First, use the database.yml file. This deploys three Kubernetes components:
- Namespace: usersapp,
- Deployment: usersapp-db (using postgres:9.6 image)
- Service: usersapp-db to expose usersapp-db within the cluster.
Configure the usersapp-db deployment to set the PostgreSQL user, password, and database using environmental variables accepted by the Postgres image:
spec:
  containers:
  - name: usersapp-db
    image: postgres:9.6
    imagePullPolicy: IfNotPresent
    ports:
      - containerPort: 5432
    env:
    - name: POSTGRES_PASSWORD
        value: Password4321
      - name: POSTGRES_DB
        value: users_app
      - name: POSTGRES_USER
        value: users_app
The same values appear in the manifest for the Users app (see the k8s/app.yaml file):
spec:
  containers:
  - image: users:v1
    imagePullPolicy: IfNotPresent
    name: usersapp
    ports:
    - containerPort: 8080
    env:
      - name: DB_USERNAME
        value: users_app
      - name: DB_PASSWORD
        value: Password4321
      - name: DB_PLATFORM
        value: postgres
      - name: DB_URL
        value: postgresql://usersapp-db.usersapp.svc.cluster.local:5432/postgres
Also, the app.yaml file contains an additional definition of the DB_URL environment variable to set up the PostgreSQL URL:
jdbc:postgresql://usersapp-db.usersapp.svc.cluster.local:5432/postgres
The latter is set based on the database.yaml file:
(<name of the service>.<namespace>.svc.cluster.local:<port>/postgres)
Also, note that app.yaml takes the user’s image tagged with v1 from the local repository.
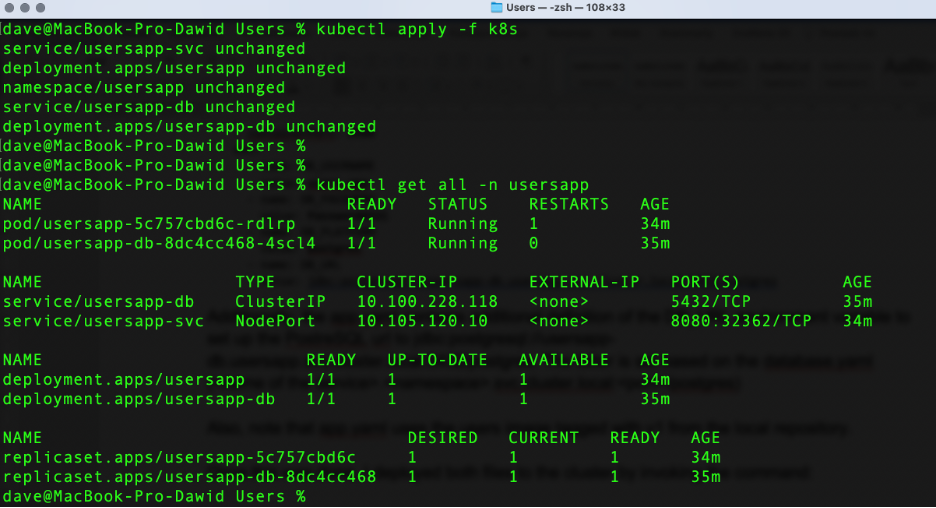
Now, deploy both files to the cluster by invoking the command:
kubectl apply -f k8s/
Then, check the deployments with kubectl get all -n usersapp.
The output of both commands is:
The NodePort Kubernetes service exposes the Users application, so that you can access it by the node IP and port. To get the full IP, invoke the following command:
kubectl describe service usersapp-svc -n usersapp | grep Endpoints | awk '{print $2}'
This outputs the following IP address and port:

In this case, however, we are using Docker Desktop in order to access the app using localhost and NodePort (here, it is 32362).
After navigating to this endpoint, you see the following:
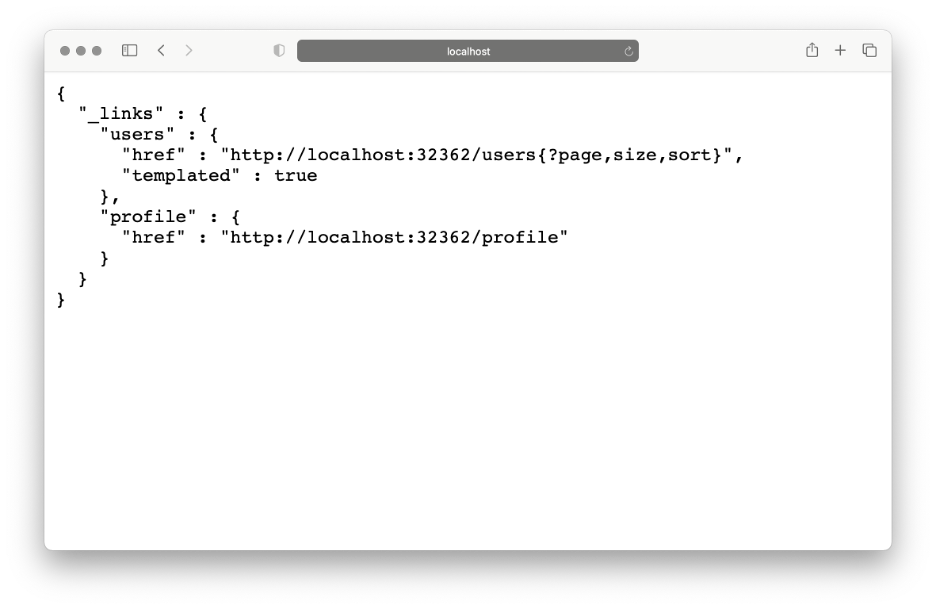
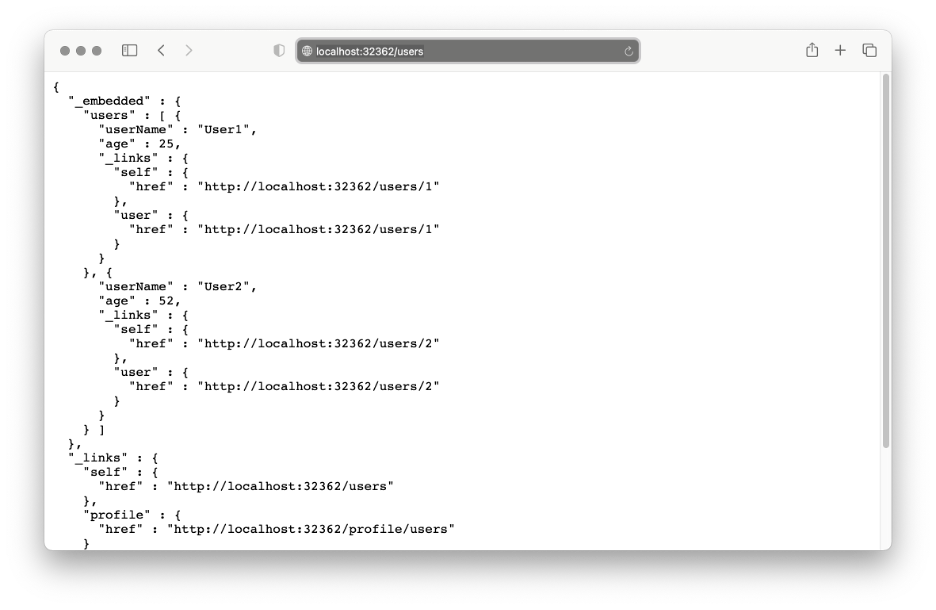
You can also navigate to the users endpoint (localhost:32362/users), where you see the empty list of users. Let’s add one or two more users by sending the POST request:
curl -i -X POST -H "Content-Type:application/json" -d "{  \"userName\" : \"User1\",
\"age\" : 25}" http://localhost:32362/users
The users endpoint should report the following list of elements:
Securing the Secrets with CyberArk Conjur
We have now deployed the Java Spring MVC application to the Kubernetes cluster. However, the sensitive information (database connection settings) is in open text in Kubernetes manifest files. To overcome this problem, we must secure our environmental variables by storing sensitive data with CyberArk Conjur.
To do so, deploy CyberArk Conjur to the cluster using steps seven to nine from this interactive tutorial. The tutorial uses the app and namespace of the name testapp. Hence, we have to update the manifest files to change the application name and the namespace to usersapp. All the files are in the referenced repository in the conjur folder.
Then, create a layer and the policy (conjur/usersapp-policy.yml):
conjur policy load root /root/conjur/usersapp-policy.yml
This policy stores information about four secret variables (password, username, host, and port). The app then uses them to associate the connection with PostgreSQL. To configure their actual values, invoke the following:
conjur variable values add app/usersapp/secret/password "Password4321"
conjur variable values add app/usersapp/secret/username "users_app"
conjur variable values add app/usersapp/secret/host
"usersapp-db.usersapp.svc.cluster.local"
conjur variable values add app/usersapp/secret/port "5432"
Note that those variables store the sensitive data that we previously had in the Kubernetes manifest files.
Next, load the app-policy.yml file:
conjur policy load root /root/conjur/app-policy.yml
The next step is to apply the Conjur authenticator role to the cluster:
kubectl create -f conjur/conjur-authenticator-role.yml
Now, store the Conjur SSL certificate and secretless configuration in a ConfigMap:
kubectl -n usersapp create configmap conjur-cert
--from-file=ssl-certificate="conjur-default.pem"

kubectl -n usersapp create configmap secretless-config
--from-file=./conjur/secretless.yml
Once finished, we must update the Dockerfile to install the Conjur client components in the Docker image. The necessary changes appear in bold below:
# Conjur
FROM ruby:2.4 as summon
RUN apt-get update && \
    apt-get install -y --no-install-recommends curl

# Install summon and summon-conjur
RUN curl -sSL https://raw.githubusercontent.com/cyberark/summon/master/install.sh \
      | env TMPDIR=$(mktemp -d) bash && \
    curl -sSL
https://raw.githubusercontent.com/cyberark/summon-conjur/master/install.sh \
      | env TMPDIR=$(mktemp -d) bash

# Application
FROM maven:3.8.1-jdk-11-slim as maven

WORKDIR /app

# Copy pom.xml and uses it to install all the dependencies
COPY ./pom.xml ./pom.xml
RUN mvn verify clean --fail-never

# Copy the source and package the application
COPY ./src ./src
RUN mvn package && cp target/users-*.jar users.jar

# Prepare final image using runtime only
FROM openjdk:11-jre-slim

COPY --from=summon /usr/local/lib/summon /usr/local/lib/summon
COPY --from=summon /usr/local/bin/summon /usr/local/bin/summon
COPY --from=maven /app/users.jar /users.jar

ENTRYPOINT [ "java", "-jar", "/users.jar"]
Let’s now rebuild the Docker image and add the v2 tag:
docker build -t users:v2 .
Deploying an Updated Application
We are now ready to deploy an updated, secured version of the Users application. From this, the app connects to the same database using secrets stored in the Conjur vault. To deploy it, we use the attached manifest file (conjur/usersapp-secure.yml):
kubectl apply -f conjur/usersapp-secure.yml
The manifest file deploys three components:
- usersapp-secure-sa, the service account used to access Conjur
- usersapp-secure, the deployment composed of two pods: secretless, used by Conjur and usersapp-secure, the updated version of our app, in which we use the users:v2 image
- usersapp-secure, the service that exposes usersapp-secure Deployment within the Kubernetes cluster
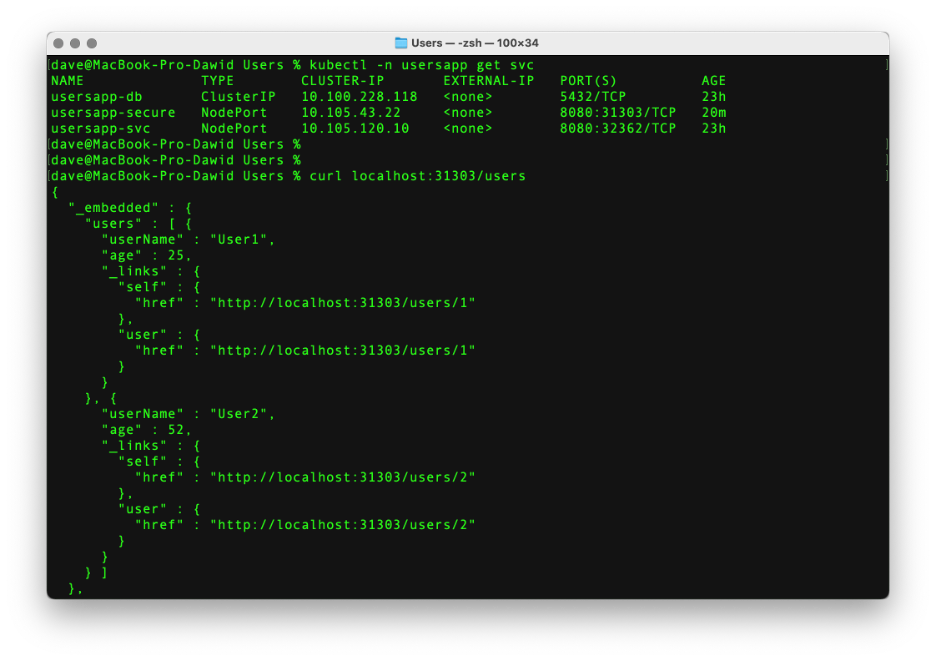
At this point, it’s good to check the pod logs to see if everything went well. For the secretless pods, the log stream should end with “Successfully authenticated,” while the usersapp-secure pod should contain standard Spring logs.
Let’s check the Kubernetes services to find the new NodePort (kubectl -n usersapp get svc). Now, send the request to the node (in our case, it’s localhost:31303/users). The app responds with the same list of users as before.
Summary
In this tutorial, we demonstrated how to set up the Java Spring MVC application backed with the PostgreSQL datastore and deploy it to a local Kubernetes cluster. Afterward, we secured the sensitive database connection information with Conjur CyberArk. This tutorial provides an overview of the steps you must take to secure your app with Conjur CyberArk. The advantage is that the approach is cross-platform and doesn’t rely on specific cloud provider services.