
Most secrets management solutions rely on a master key or “secret zero” that can unlock other credentials. The problem is if this secret is compromised, all your resources are at risk.
Some solutions look at splitting the secret zero or putting secrets into Hardware Security Modules (HSM). Conjur, on the other hand, deploys authenticators that use unique attributes of the systems they are deployed on.
In this article we are going to go through the secret zero problem and show how Conjur’s approach minimizes your risk of exposure.
Why is Secret Zero an Issue?
Secret zero is when you store all your secrets in your secret manager with a single master key to unlock your vault — one secret that can unlock all others: secret zero.
When you implement centralized secrets management, it is easy to fall into the trap of creating a secret zero trap. You just replaced a bunch of passwords with a single password, for example. This can greatly increase the exposure and risk that your environment carries. Having a very lucrative single target to attack makes it an ideal candidate for bad actors to go after.
Some solutions to secret zero split the master key or use HSMs to provide authentication and authorization to the secrets manager. This, however, just moves the issue down a step. It helps, but in a limited way.
A better approach to the secret zero problem is a secrets management solution like Conjur. It greatly reduces the risks of secret zero in your applications.
How is Conjur different? A previous article about Conjur’s approach says that the secret zero problem is mitigated by setting up a pre-defined authentication between the platform being used and the secret manager. Secrets management is important in all systems, however, it is more important in complicated, scalable container orchestration systems. This is where Conjur fits in, by supporting authentication in a number of orchestration systems such as Kubernetes and Cloud Foundry. This means we can create the pre-defined authentication from these systems to our secret manager without falling into the secret zero trap, without passing the responsibility down layers through HSM or master key splitting.
Secrets Management in Action
We will look at how this works in Kubernetes, three steps allowing us to mitigate risk with better and safer authentication into our secret manager. Kubernetes authenticates its environment and the applications with Conjur in a number of ways before any secrets are released.
1. Mutual TLS
The first step is to create the connection between Kubernetes and Conjur. I have taken the example shown in the Kubernetes Authentication blog post which we will use as the discussion point. This is done via TLS handshake to then create a Mutual TLS certificate and connection.
Step 1, is to verify Conjur, which is done by making the self-signed public certificate that is created with an instance of a Conjur pod available to your Kubernetes Cluster.
$ ssl_cert=$(kubectl exec [conjur-pod-name] -- cat /opt/conjur/etc/ssl/conjur.pem)

$ kubectl create configmap conjur-public-cert --from-file=ssl-certificate=<(echo "$ssl_cert")

We then supply the certificate to containers within our cluster by modifying the manifest for environment creation.
- name: CONJUR_SSL_CERTIFICATE
  valueFrom:
    configMapKeyRef:
      name: conjur-public-cert
      key: ssl-certificate
Step 2, is to then verify the Sidecar. What is the sidecar? It’s a container that is deployed alongside your application and which handles the authentication between your application and your Conjur instance.
To obtain the Mutual TLS certificate, the sidecar follows the process (discussed in the above linked blog article), which is again detailed in the following image. I will not go through the full details as this is automated into the sidecar.
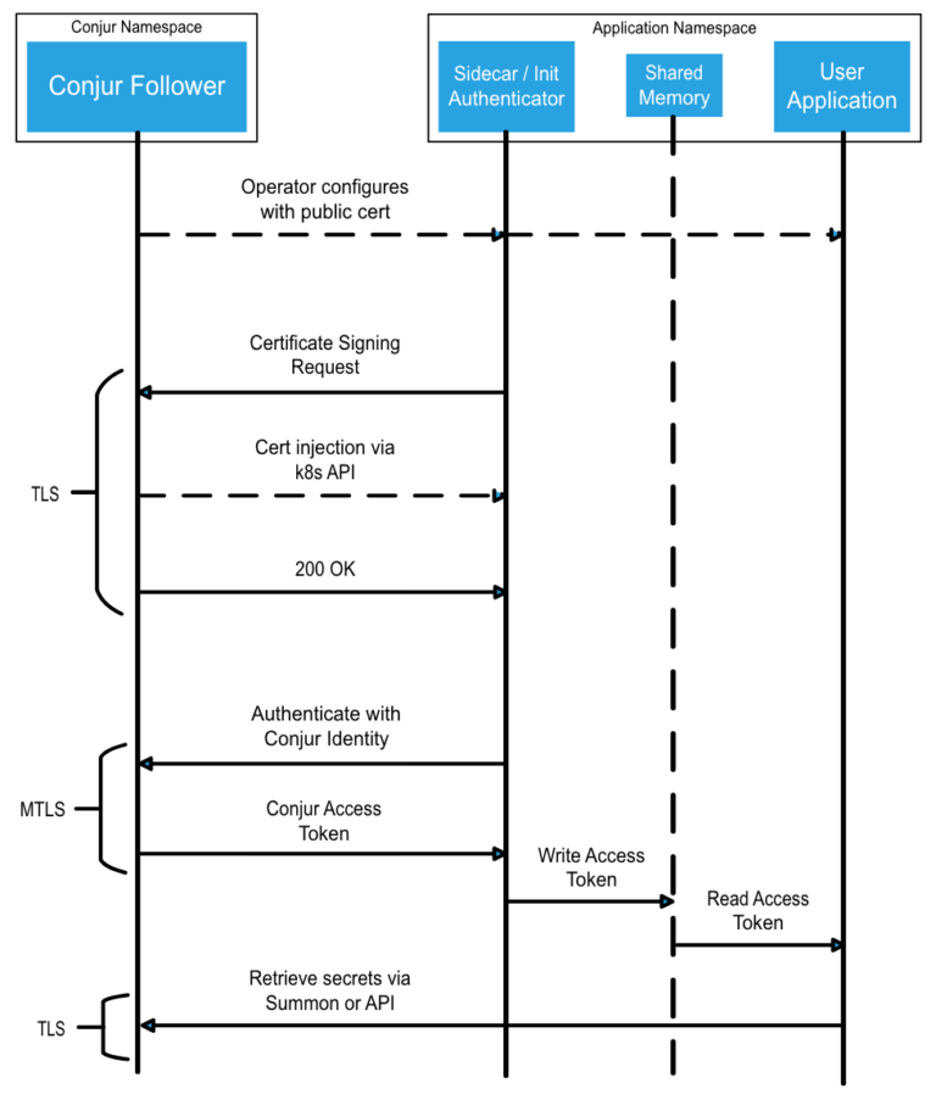
If the certificate is invalid or doesn’t exist, then the connection will fail. This is already stronger than one of the other solutions, split master keys. Having a system of mutually-signed certificates stored in the two environments avoids sharing keys across multiple environments and is individual to the system accessing the secret manager. This allows you to replace a single certificate without having to do this in every environment you may have. It also allows for more granular control of which environment has access to what keys, as you may have one cluster needing access to only particular secrets, not the master key to access all.
2. Policy Creation & Modification
This leads to the second way to authenticate and authorize secrets: policy definition with greatly-improved granularity.
As we just alluded to, having a separate certificate or connection to your secrets per environment allows for greater control of secret access when the connection is established. With Kubernetes, you can use extra controls to improve that access and decrease access to secrets where they are not needed. Using values like Namespace, Deployment, Stateful Set, Service Account, or Pod decreases the surface area of not just access to the secret vault, but each secret you store within the manager.
As an example, you can create a policy which means a secret is only available to a namespace called namespace-1 by using the following:
- !policy
  id: apps
  body:
    - !group

    - !host
      id: test-app
      annotations:
        authn-k8s/namespace: namespace-1
        authn-k8s/authentication-container-name: test-container

    - !grant
      role: !group
      member: !host test-app
In the code above authn-k8s/authentication-container-name is the container name from which the host authenticates with Conjur. Save the policy as apps.yml and load it to root or to any other branch where you want the policy to reside. You can see this example and other policy documentation in the Application Identity in OpenShift/Kubernetes documentation.
3. Shared Access Token
Third, and finally, you can use a shared-access token. This is a rotating token the Conjur client and server use to allow applications within your Kubernetes cluster to retrieve secrets from your manager.
This is done using the Kubernetes Authenticator Client, which makes your Kubernetes environment a client of the Conjur instance and allows your applications to access secrets through this connection. A tutorial on how to install and use the client is a little too long for this article, however, the documentation guides you through that process in all the detail you would require to get started.
Using the three steps above will increase the number of authentication mechanisms beyond a simple master key. By limiting access to secrets, you greatly reduce the attack area and risk of secret zero becoming part of your applications.
Next Steps
Moving and consolidating secrets management into Conjur, rather than using multiple secret management services across multiple cloud service providers improves the security of your application.
The next step after the move is to implement the secret zero solution. Moving to the Conjur multi-factor authentication mechanism approach helps you feel safe in the knowledge you’re not using a single key across all applications to access all of your secrets. You have the granularity of controlling what application and environments have access to what secrets and when. This restriction keeps your secrets safe and harder to compromise. As a bonus, you can still manage secrets easily with little effort needed when a secret changes.
To discover for yourself how easy it is to tighten your application security, check out Conjur today.

John Walsh has served the realm as a lord security developer, product manager and open source community manager for more than 15 years, working on cybersecurity products such as Conjur, LDAP, Firewall, JAVA Cyptography, SSH, and PrivX. He has a wife, two kids, and a small patch of land in the greater Boston area, which makes him ineligible to take the black and join the Knight’s Watch, but he’s still an experienced cybersecurity professional and developer.