Developing modern web applications in the cloud nowadays is more streamlined than ever. This is true because many external vendors and SaaS companies have been formed to ease the work of the developer, the prime implementer of business functionality.
A very common case is when we have a Node.js application that connects to a MongoDB instance. For the uninitiated, Node.js is a Javascript runtime that runs as a server application and MongoDB is a scalable and flexible NoSQL database system.
A very common concern with cloud applications is, ‘how do we manage secrets not only in a secure way, but in a way that scales as we introduce more instances?’ We want our applications to be agnostic of any secrets and not have hard-coded credentials placed around such as database connections or certificates that need to be rotated frequently by administrators.
I created an interesting multi-cloud MongoDB project with a Node.js demo application, but it uses secrets that need to be secured and managed across the cloud. In this tutorial we are going to provide a step-by-step guide to secure a third party’s Mongo API with the help of Cyberark Conjur, which is an Enterprise-ready Secrets and Machine Identity Platform. At the end of this tutorial we will be able to manage our MongoDB credentials in a scalable and safe way that will make our developers and security engineers happier.
Let’s get started!
Demo Application
Let’s start first by deploying an example application that leverages Node.js on the server and MongoDB for database storage. We can use any public repo for our example. In this tutorial I picked Node.js Express Mongoose Demo, which is a typical blog application where users can sign up, create an article, delete an article and add comments, etc.
The easiest way to get started is to first clone the repo and install the dependencies:
$ git clone git://github.com/madhums/node-express-mongoose-demo.git
$ cd node-express-mongoose-demo
$ npm i
$ cp .env.example .env
The last command creates a copy of the .env.example file, which is used to store environment variables and secrets. Let’s see what’s inside:
$ cat .env
TWITTER_CLIENTID=
TWITTER_SECRET=
GITHUB_CLIENTID=
GITHUB_SECRET=
LINKEDIN_CLIENTID=
LINKEDIN_SECRET=
GOOGLE_CLIENTID=
GOOGLE_SECRET=
IMAGER_S3_KEY=AWS_S3_KEY
IMAGER_S3_SECRET=AWS_S3_SECRET
IMAGER_S3_BUCKET=AWS_S3_BUCKET
MONGODB_URL=mongodb://mongo:27017/noobjs_dev
As we can see, there are several sensitive variables here that we may want to protect. It’s not ideal to have them located in a file here in the repo, as we may accidentally commit them in the repo. Plus, there is no easy way to rotate them or audit their usage. Later in the tutorial we will see how we can use Conjur for that case.
For this tutorial, we are only interested in the MONGODB_URL, which we want to replace with a URL served from an external vendor.
We can do a test run of our application using docker-compose:
$ docker-compose up -d
When all is done, we can visit localhost:3000 to see our application live:

This however, as mentioned before, is using a local MongoDB instance, which we would like to replace with a 3rd-party MongoDB service. Let’s see how we can do that next.
Using 3rd-party Mongo APIs
3rd-party Mongo APIs are what we commonly call databases-as-a-service. Those are online services that offer managed MongoDB instances for on-demand needs. When you lease those instances, you get a unique URL that can be used to connect to that instance from your application.
For the purpose of this tutorial, we will be using MongoDB Atlas, which is managed by MongoDB Inc itself.
Let’s walk through the process of registering, creating and accessing the database instance.
First, navigate to the Signup page and create a new account. This will create a new MongoDB Atlas account (Fig 1).
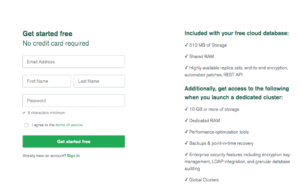
Fig 1. Register with MongoDB Atlas screen
Once you register, you are presented with the following screen to guide you through the process of creating your first cluster (Fig 2).
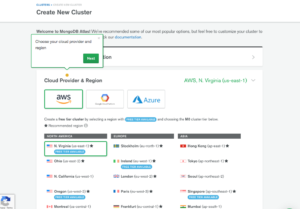
Fig 2. Creating a new Cluster screen
Because I will be using Azure to host the Conjur Server, I picked Azure for the Cloud Provider, but the steps are no different if you pick AWS or GCloud.
Next we need to pick a region. I picked Ireland as it has a Free tier available here in Europe (Fig 3).

Fig 3. Picking a region step
In the next step we need to pick a cluster type. Here I picked the M0 Sandbox, which is the Free Tier and offers 500mb of storage – more than enough for our Demo (Fig 4).
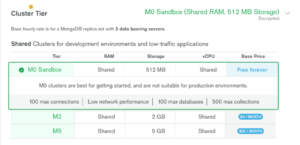
Fig 4. Picking a Tier step
In the last step we need to give our cluster a name. Pick something semantic. For example demo-develop-cluster-0 (Fig 5).
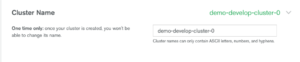
Fig 5. Picking a Cluster name step
Click on the Create Cluster button on the bottom to apply the form.
Once the cluster is ready, you are presented with the dashboard view (Fig 6). You may also need to choose your region from the top button toolbar.
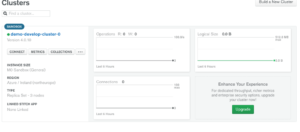
Fig 6. Dashboard View
In the next step we need to configure IP whitelisting to connect with our cluster. Click on the Network Access and the Add IP Address Button on the right hand side (Fig 7)
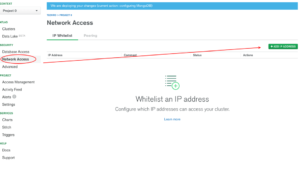
Fig 7. Network Access View
You will be asked to whitelist an IP. For now, we can pick our own by clicking the ADD CURRENT IP ADDRESS button. If you were to run the application from the cloud, you would need to add the IP address of the server that hosts the application. (Fig 8)
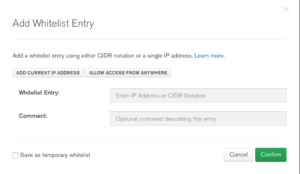
Fig 8. Add whitelist entry View
Before we can connect to the cluster, we need to create two things: First, the database and an initial collection for our application. Second, an application user with the right permissions to access the database.
Let’s start with the database.
On the cluster view click on the Collections button (Fig 9)
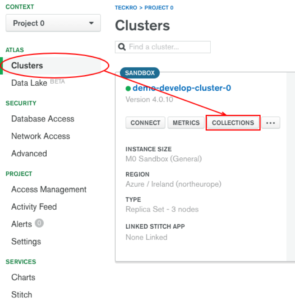
Fig 9. Add new collection view
Then click on the Add my own data button where you will be presented with a modal to create a new database (Fig 10).
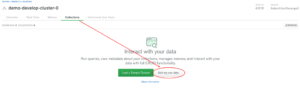
Fig 10. Add my own data view
Name your database demo-db and create a new collection, users. The app will also create a sessions collection and other collections for the articles (Fig 11).
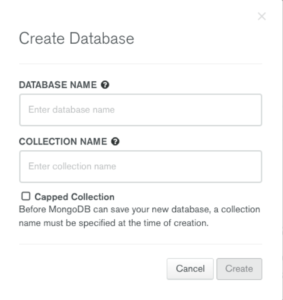
Fig 11. Create Database modal
Now for the application credentials. We can do that via the Database Access tab.
Select it and click on the MongoDB Roles tab first to create a new custom role for our database. Then click on the ADD NEW CUSTOM ROLE button (Fig 12).
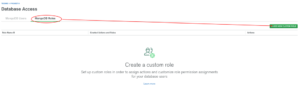
Fig 12. Create MongoDB roles view
In the modal that appears, make sure you assign a role name (dbUserRole), select the actions (Collection Actions) and the database (demo-db), and click the Add custom Role button Fig 13).
Now we are ready to create a user from that role. Click on the MongoDB Users tab and then the ADD NEW USER button on the right hand side (Fig 14).
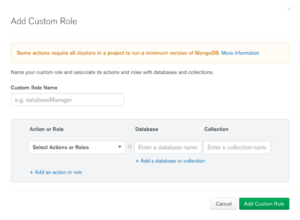
Fig 12. Add new user View
In the appearing modal, select the custom role (dbUserRole) and a name (dbUser), and auto-generate a password before you save (Fig 13).

Fig 13. Add new user Modal
Once we have done all those steps, we need to verify our connection works. Click on the Clusters -> Connect button (Fig 14).
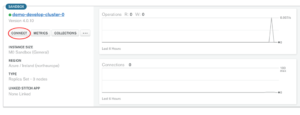
Fig 14. Clusters connect view
You will be presented with a modal that allows you to use several methods to connect to the cluster. For a quick check, select the Connect Your Application option and select the Full Driver Example > Node.js -> Version 2.2.12 or later, due to some issues with connect-mongo plugin. Copy paste the following code to a new file index.js and modify it to use the password and the database you defined before. Install the mongo package and run the code (Fig15).
$ npm i mongo --save

$ touch index.js
$ cat index.js <<ENDL
const MongoClient = require('mongodb').MongoClient;
const uri = 'mongodb://dbUser:kz2IHL5IlQvvzKdU@demo-develop-cluster-0-shard-00-00-zlfil.azure.mongodb.net:27017,demo-develop-cluster-0-shard-00-01-zlfil.azure.mongodb.net:27017,demo-develop-cluster-0-shard-00-02-zlfil.azure.mongodb.net:27017/demo-db?ssl=true&replicaSet=demo-develop-cluster-0-shard-0&authSource=admin&retryWrites=true&w=majority';
const client = new MongoClient(uri, { useNewUrlParser: true });
client.connect(err => {
  const collection = client.db("demo-db").collection("users");
  console.warn(collection);
  // perform actions on the collection object
  client.close();
});

ENDL

$ node index.js
Collection {
  s:
   { pkFactory:
      { [Function: ObjectID]
...
Since we are working on our Application, we can just replace the MONGODB_URL in our .env file with the one we got from MongoDB Atlas and restart docker-compose:
File: .env
…
MONGODB_URL=mongodb://dbUser:kz2IHL5IlQvvzKdU@demo-develop-cluster-0-shard-00-00-zlfil.azure.mongodb.net:27017,demo-develop-cluster-0-shard-00-01-zlfil.azure.mongodb.net:27017,demo-develop-cluster-0-shard-00-02-zlfil.azure.mongodb.net:27017/demo-db?ssl=true&replicaSet=demo-develop-cluster-0-shard-0&authSource=admin&retryWrites=true&w=majority

$ docker-compose restart
If we observe the logs and visit localhost:3000 again, we will see our app again, but now it will get the data from the MongoDB Atlas instance. We can verify that when we navigate to the Cluster -> Collections tab where we can see a new Sessions collection (Fig 15).
Fig 15. New Collections created
Now that we have our Application connected to a 3rd-party MongoDB instance, let’s go ahead and leverage the power of Conjur to manage the retrieval of the MONGODB_URL from the secrets store instead of the environmental variable.
Setting up Conjur
For the purpose of this tutorial we need a Conjur Cluster for storing and retrieving our secrets. Here are some of the steps I took to create one with Azure:
1. Create a Resource Group and set it as default:
$ az group create --name=ConjurDemo
$ az configure --defaults group=ConjurDemo
Prerequisites: determine your Azure location supports the burstable vm sku ‘Standard_B1s’. You can check this with the following:$ az vm list-skus –location –size Standard_B1s –output table
Standard_B1s provisions 1GB RAM. You may need to increase the size of the VM if you encounter memory issues below. Standard_B1ms provisions 2GB and should be adequate for this application.
If you do not already have an ssh key pair, you will need to append ‘–generate-ssh-keys’ to the end of step 2 below.
2. Create a new VM instance based on UbuntuLTS, with a public DNS name:
$ az vm create -n appVm --image UbuntuLTS --size Standard_B1s --public-ip-address-dns-name conjur-demo
This will return a FQDNS that we need to store in a variable for later:
fqdns: conjur-demo.northeurope.cloudapp.azure.com
3. Connect to the instance and install Docker and Docker Compose. You have to use your current user name to login:
$ ssh [email protected]
$ sudo apt update
$ sudo apt install apt-transport-https ca-certificates curl software-properties-common
$ curl -fsSL https://download.docker.com/linux/ubuntu/gpg | sudo apt-key add -
$ sudo add-apt-repository "deb [arch=amd64] https://download.docker.com/linux/ubuntu bionic stable"
$ sudo apt update
$ sudo apt install docker-ce
$ sudo systemctl status docker

$ sudo curl -L "https://github.com/docker/compose/releases/download/1.23.1/docker-compose-$(uname -s)-$(uname -m)" -o /usr/local/bin/docker-compose
$ sudo chmod +x /usr/local/bin/docker-compose
$ docker-compose --version
$ sudo usermod -aG docker ${USER}
4. Log out and log in to the shell again, and create a new folder for installing Conjur:
$ mkdir conjur
$ cd conjur
5. Create a default.conf file for the nginx configuration:
$ cat << ENDL > default.conf
server {
    listen 80;
    return 301 https://conjur$request_uri;
}
server {
    listen 443;
    server_name localhost conjur-demo.northeurope.cloudapp.azure.com;
    ssl_certificate /etc/nginx/nginx.crt;
    ssl_certificate_key /etc/nginx/nginx.key;

    ssl on;
    ssl_session_cache builtin:1000 shared:SSL:10m;
    ssl_protocols TLSv1 TLSv1.1 TLSv1.2;
    ssl_ciphers HIGH:!aNULL:!eNULL:!EXPORT:!CAMELLIA:!DES:!MD5:!PSK:!RC4;
    ssl_prefer_server_ciphers on;

    access_log            /var/log/nginx/access.log;

    location / {
      proxy_pass http://conjur:3000;
    }

    #error_page 404 /404.html;

    # redirect server error pages to the static page /50x.html
    #
    error_page 500 502 503 504 /50x.html;
    location = /50x.html {
        root /usr/share/nginx/html;
    }

}

ENDL
6. We will need some self-signed certificates for the Nginx Proxy. Make sure you specify the full FQDN of our server on the Common Name entry:
$ openssl req -x509 -sha256 -newkey rsa:2048 -keyout cert.key -out cert.crt -days 1024 -nodes
Can't load /home/itspare/.rnd into RNG
140237486809536:error:2406F079:random number generator:RAND_load_file:Cannot open file:../crypto/rand/randfile.c:88:Filename=/home/itspare/.rnd
Generating a RSA private key
.................................................................................+++++
...........+++++
writing new private key to 'cert.key'
-----
You are about to be asked to enter information that will be incorporated
into your certificate request.
What you are about to enter is what is called a Distinguished Name or a DN.
There are quite a few fields but you can leave some blank
For some fields there will be a default value,
If you enter '.', the field will be left blank.
-----
Country Name (2 letter code) [AU]:IE
State or Province Name (full name) [Some-State]:Limerick
Locality Name (eg, city) []:Limerick
Organization Name (eg, company) [Internet Widgits Pty Ltd]:Demo
Organizational Unit Name (eg, section) []:Dev
Common Name (e.g. server FQDN or YOUR name) []:conjur-demo.northeurope.cloudapp.azure.com
Email Address []:
7. Next create the docker-compose.yml file that will describe your Conjur Server:
$ cat << ENDL > docker-compose.yml
version: '2'
services:
  postgres:
    image: postgres:9.3

  conjur:
    image: cyberark/conjur:latest
    command: server -a cucumber
    environment:
      PORT: 3000
      DATABASE_URL: postgres://postgres@postgres/postgres
      CONJUR_DATA_KEY: "W0BuL8iTr/7QvtjIluJbrb5LDAnmXzmcpxkqihO3dXA="
    ports:
      - "3000:3000"
    depends_on:
      - postgres

    proxy:
      image: nginx:1.13.6-alpine
      container_name: nginx_proxy
      ports:
        - "80:80"
        - "443:443"
      volumes:
        - ./default.conf:/etc/nginx/conf.d/default.conf:ro
        - ./cert.key:/etc/nginx/nginx.key:ro
        - ./cert.crt:/etc/nginx/nginx.crt:ro
      depends_on: [ conjur ]

  client:
    image: cyberark/conjur-cli:5
    volumes:
      - ./test-cert:/test-cert
    entrypoint: sleep
    command: infinity
    environment:
      CONJUR_APPLIANCE_URL: https://proxy
      CONJUR_ACCOUNT: cucumber
      CONJUR_AUTHN_LOGIN: admin

ENDL
The Nginx Proxy listens to both ports 80 and 443, and it will proxy all the requests to https://conjur:3000
8. Run docker-compose and observe the logs in the console. Look for a string named:
API key for admin:
and save it somewhere safe. This is the admin account key to interact with the REST API:
$ docker-compose up
9. Before we can access our cluster, we need to open some ports in our Azure instance as, by default, they are blocked by a firewall:
$ az vm open-port -n appVm --port 80 --priority 100
$ az vm open-port -n appVm --port 443 --priority 101
10. It may take a while once the ports are propagated, but after a few minutes, you should be able to visit the hostname and see the Conjur Welcome Page (Fig 16).
https://conjur-demo.northeurope.cloudapp.azure.com/
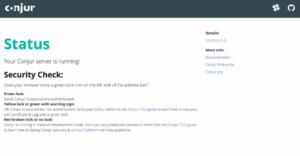
Fig 16. Conjur self-hosted on Azure
Now that we have the Conjur Server started, let’s try to connect it with our App.
Connecting our app with Conjur
We have successfully created a Conjur Server and we are ready to populate some policies for retrieving our MONGODB_URL secret.
First, on your local machine install Conjur-CLI:
$ gem install conjur-cli
Run the init option to configure some defaults:
$ conjur init
Enter the URL of your Conjur service: https://conjur-demo.northeurope.cloudapp.azure.com

SHA1 Fingerprint=93:3B:A0:23:CC:75:6B:3D:29:EE:F2:40:74:45:79:BC:7A:C4:81:53

Please verify this certificate on the appliance using command:
openssl x509 -fingerprint -noout -in ~conjur/etc/ssl/conjur.pem

Trust this certificate (yes/no): yes
Enter your organization account name: cucumber
Wrote certificate to /Users/itspare/conjur-cucumber.pem
Wrote configuration to /Users/itspare/.conjurrc
This will configure the CLI to connect to the appliance URL in Azure. It will also create a copy of the certificate and save it into our users $HOME.
Then we need to log in as admin and apply our first policy. When it asks for a password, enter the admin key that we saved earlier:
$ conjur authn login
Enter your username to log into Conjur: admin
Please enter your password (it will not be echoed):
Logged in
Now we’ll create a policy that creates an Admin user for our application and an account for the services to use. Save this as a YAML file. I chose AppPolicy.yml:
id: BlogPolicy
body:
# Define an administrator, service account and variable for the API Key
– !user BlogAdmin
– !host BlogApp
– !variable mongodbURI
– !permit
# Give read and write permissions to the administrator.
role: !user BlogAdmin
privileges: [read, update, execute]
resource: !variable mongodbURI
– !permit
# Give read permissions to the service account to fetch the API Key.
role: !host BlogApp
privileges: [read, execute]
resource: !variable mongodbURI
Now we can load the policy into Conjur with a command similar to that shown below.
$ conjur policy load root AppPolicy.yml
Loaded policy 'root'
{
  "created_roles": {
    "cucumber:user:BlogAdmin@BlogPolicy": {
      "id": "cucumber:user:BlogAdmin@BlogPolicy",
      "api_key": "362qn959fasvn3y8gy3fm0tkcg1hw7c4e1q7pkxcgc3xkp2p0cm8x"
  },
  "cucumber:host:BlogPolicy/BlogApp": {
    "id": "cucumber:host:BlogPolicy/BlogApp",
    "api_key": "142a7mw16bstjm3bys8195ws7kd3azmfa8101zq3329hpg7q1xvrqhj"
    }
  },
  "version": 1
}
Here root specifies a policy ID.
You should see results similar to those shown below. We’ll be using the keys next, so be sure to store them in a safe place.
Log out of the admin account, and log in as the BlogAdmin user, using the API Key that was returned when we created the account.
$ conjur authn logout
Logged out
$ conjur authn login -u BlogAdmin@BlogPolicy
Please enter BlogAdmin@BlogPolicy's password (it will not be echoed):
Logged in
Now we can store the mongodbURI for the 3rd-party MongoDB API in the secure store:
$ conjur variable values add BlogPolicy/mongodbURI "mongodb://dbUser:kz2IHL5IlQvvzKdU@demo-develop-cluster-0-shard-00-00-zlfil.azure.mongodb.net:27017,demo-develop-cluster-0-shard-00-01-zlfil.azure.mongodb.net:27017,demo-develop-cluster-0-shard-00-02-zlfil.azure.mongodb.net:27017/demo-db?ssl=true&replicaSet=demo-develop-cluster-0-shard-0&authSource=admin&retryWrites=true&w=majority"
Conjur should respond with Value added. You can also verify the contents using the following command:
$ conjur variable value BlogPolicy/mongodbURI
mongodb://dbUser:kz2IHL5IlQvvzKdU@demo-develop-cluster-0-shard-00-00-zlfil.azure.mongodb.net:27017,demo-develop-cluster-0-shard-00-01-zlfil.azure.mongodb.net:27017,demo-develop-cluster-0-shard-00-02-zlfil.azure.mongodb.net:27017/demo-db?ssl=true&replicaSet=demo-develop-cluster-0-shard-0&authSource=admin&retryWrites=true&w=majority%
Now we’re ready to implement this solution in our project.
We need a way to retrieve our secret from the Conjur server using our host credentials. Currently there is no official Node.js client for accessing the Conjur REST API so we need to do it the old way.
I’ve assembled a small demo code (which is more like a proof of concept) that uses the credentials to retrieve the mongodbURI secret from Conjur.
First, install the dependencies:
$ npm i request-promise-native request-promise --save
Truncate the index.js file, then add the following code and run:
$ cp /dev/null index.js
$ cat << ENDL >> index.js
const rp = require('request-promise-native');
const fs = require('fs');
const APPLIANCE_URL = 'https://conjur-demo.northeurope.cloudapp.azure.com/';
const SECRET_VAR = 'BlogPolicy/mongodbURI';
const CERT_PATH = '/Users/itspare/conjur-cucumber.pem';
const account = 'cucumber';
const CONJUR_LOGIN = 'host/BlogPolicy/BlogApp';
const CONJUR_TOKEN = 'wpsttdjqejgm2bxdztsanbys8dxs4xr2g76sxk1s0qtfx3mjzvzn';

const loginPath = APPLIANCE_URL + `authn/${account}/login`;
const authPath =
  APPLIANCE_URL +
`authn/${account}/${encodeURIComponent(CONJUR_LOGIN)}/authenticate`;
const retrieveSecretPath =
  APPLIANCE_URL +
`secrets/${account}/variable/${encodeURIComponent(SECRET_VAR)}`;

const tokenHeader = token => {
  return `Token token="${new Buffer(JSON.stringify(token)).toString(
    'base64'
  )}"`;
};

rp.post({ // (1) First post retrieves the auth token
  url: authPath,
  body: CONJUR_TOKEN,
  agentOptions: {
    ca: fs.readFileSync(CERT_PATH)
  }
})
  .then(function(body) {
    rp.get({ // (2) Second get retrieves the secret
      url: retrieveSecretPath,
      headers: {
        Authorization: tokenHeader(body)
      },
      agentOptions: {
        ca: fs.readFileSync(CERT_PATH)
      }
    }).then(function(response) {
      console.log(response);
    });
  })
  .catch(function(err) {
    console.warn(err);
  });
ENDL
Here the (1) First POST request uses the API keys to exchange them with a temporary auth token. We then use the token to retrieve the secret from the store:
$ node index.js
mongodb://dbUser:kz2IHL5IlQvvzKdU@demo-develop-cluster-0-shard-00-00-zlfil.azure.mongodb.net:27017,demo-develop-cluster-0-shard-00-01-zlfil.azure.mongodb.net:27017,demo-develop-cluster-0-shard-00-02-zlfil.azure.mongodb.net:27017/demo-db?ssl=true&replicaSet=demo-develop-cluster-0-shard-0&authSource=admin&retryWrites=true&w=majority%
Now that we have everything in place, let’s perform the final step. Modify our original application so that we retrieve the MONGODB_URL from the secrets store instead of the environment variable.
If we look at the contents of the project, the MONGODB_URL is exported in the config/env/production.js file when we run the app for production. We need to remove the following line:
db: process.env.MONGODB_URL, // <<– REMOVE
As we won’t be using it anymore, we will be retrieving the db from Conjur instead.
First, populate the .env file with the following variables:
CONJUR_AUTHN_LOGIN=host/BlogPolicy/BlogApp
CONJUR_AUTHN_API_KEY=wpsttdjqejgm2bxdztsanbys8dxs4xr2g76sxk1s0qtfx3mjzvzn
CONJUR_CERT_PATH=/Users/itspare/conjur-cucumber.pem
CONJUR_SECRET_VAR=BlogPolicy/mongodbURI
We need all of them to perform the retrieval. After that, create a new file in the following path config/services/conjur.js and add the following code (using a little bit of async magic).
$ mkdir -p config/services && cd config/services
$ touch conjur.service.js
$ cat conjur.service.js <<ENDL

const rp = require('request-promise-native');
const fs = require('fs');
const APPLIANCE_URL = process.env.CONJUR_APPLIANCE_URL;
const CERT_PATH = process.env.CONJUR_CERT_PATH;
const ACCOUNT = process.env.CONJUR_ACCOUNT;
const CONJUR_LOGIN = process.env.CONJUR_AUTHN_LOGIN;
const CONJUR_TOKEN = process.env.CONJUR_AUTHN_API_KEY;
const authPath =
  APPLIANCE_URL +
`/authn/${ACCOUNT}/${encodeURIComponent(CONJUR_LOGIN)}/authenticate`;

const tokenHeader = token => {
  return `Token token="${new Buffer.from(JSON.stringify(token)).toString(
    'base64'
  )}"`;
};

module.exports = async function(secretVar) {
  const retrieveSecretPath =
    APPLIANCE_URL +
`/secrets/${ACCOUNT}/variable/${encodeURIComponent(secretVar)}`;
  let secretValue;
  try {
    const token = await rp.post({
      url: authPath,
      body: CONJUR_TOKEN,
      agentOptions: {
        ca: fs.readFileSync(CERT_PATH)
      }
    });

    secretValue = await rp.get({
      url: retrieveSecretPath,
      headers: {
        Authorization: tokenHeader(token)
      },
      agentOptions: {
        ca: fs.readFileSync(CERT_PATH)
      }
    });
  } catch (err) {
    console.warn(err);
  }
  return secretValue;
};
ENDL
We can test it as:
const getSecret = require(‘./config/services/conjur.service’);
const SECRET_VAR = process.env.CONJUR_SECRET_VAR;
getSecret(SECRET_VAR).then((secret) => {
console.log(secret);
})
Now let’s do the final run. First, add the following lines on the top of the server.js file:
const SECRET_VAR = process.env.CONJUR_SECRET_VAR;
Wrap the code after the bootstrapping of the models, to retrieve the secret and pass it after the promise is resolved. I’ve highlighted the MONGODB_URL that we get from Conjur:
File: server.js
// Bootstrap models
fs.readdirSync(models)
  .filter(file => ~file.search(/^[^.].*\.js$/))
  .forEach(file => require(join(models, file)));

// Wrap the following code with this promise
getSecret(SECRET_VAR).then((db) => { // db == MONGODB_URL
// Bootstrap routes
    require('./config/passport')(passport);
    require('./config/express')(app, passport, db);
    require('./config/routes')(app, passport);

    connect();

    function listen() {
      if (app.get('env') === 'test') return;
        app.listen(port);
      console.log('Express app started on port ' + port);
    }

    function connect() {
      mongoose.connection
      .on('error', console.log)
      .on('disconnected', connect)
      .once('open', listen);
      return mongoose.connect(db, { keepAlive: 1, useNewUrlParser: true });
    }
});
We only need to modify the config/express.js file so that it will accept the db parameter and pass it to the session middleware:
File: config/express.js
...
module.exports = function(app, passport, db) {
…
app.use(
    session({
      resave: false,
      saveUninitialized: true,
      secret: pkg.name,
      store: new mongoStore({
        url: db,
        collection: 'sessions'
      })
    })
);
Now we can verify that our application works as expected:
$ npm install –save-dev cross-env
$ cross-env NODE_ENV=production node server.js
Note: If you run the app locally, the certificate path that you defined in the CONJUR_CERT_PATH variable must match the local path. If you run the app via docker-compose, you need to make sure the certificate is available and in the correct path. Otherwise you will have connection issues with the self-signed certificate. I leave it as an exercise to the reader.
Navigate to localhost:3000 and enjoy your app.
There you have it then! We have a complete Node.js application that connects to a third-party Mongo API using Conjur to manage its secrets. I hope you enjoyed this tutorial as much as I did. Stay put for more exciting tutorials with Conjur.
Continue The Conversation!
If you enjoyed this project or have questions join me on the CyberArk Commons. You can network with other engineers, ask for help, and contribute to the future of Conjur OSS.
Resources for further reading
● MongoDB Atlas
● CyberArk Commons
● CyberArk Conjur

Theo Despoudis is a Senior Software Engineer and an experienced mentor. He has a keen interest in Open Source Architectures, Cloud Computing, best practices and functional programming. He occasionally blogs on several publishing platforms and enjoys creating projects from inspiration.