Online demos and tutorials are a great way to introduce Kubernetes-native applications to potential users and collaborators. Often, however, these online demos and tutorials use a “Bring Your Own Cluster & Clients” approach. In other words, they require that the participant have a pre-configured Kubernetes cluster available and specific versions of clients such as kubectl and helm.
This blog will show you how to create a containerized demo for a Kubernetes-native application that:
- Uses Kubernetes in Docker (kind) to generate a “sandbox” cluster
- Bundles required versions of kubectl and helm clients (no need to install on host)
- Generates a bespoke Kubernetes cluster with add-ons (e.g. Grafana, Prometheus, or Jaeger)
- Leaves the participant in an interactive shell with kubectl/helm access
- Provides a platform for workshops and deep dives for your application
- Cleans up after itself (not including docker images)
What is Kubernetes in Docker?
Kubernetes in Docker (kind) is a relatively new tool for running Kubernetes clusters locally using Docker containers as Kubernetes nodes. Kind was originally developed to create virtualized “Kubernetes-in-Kubernetes” clusters to use in Kubernetes Continuous Integration (CI) testing.
Kind:
- Supports multi-node, virtualized clusters
- Supports Linux, macOS and Windows
- Can be configured to run various releases of Kubernetes (v1.16.3, v1.17.1, etc.)
The “All-You-Need-is-Docker” Demo Model
Rather than relying on a pre-configured Kubernetes cluster and pre-installed clients, this blog proposes a method for bundling kind and the required versions of kubectl, helm and other clients along with demo manifests, charts and other demo dependencies.
Spinning Up the Cluster
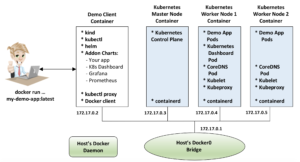
The diagram below shows that a user can use a ‘docker run …’ command to create and run a demo client container. The demo client container contains the kind, kubectl and helm binaries and, at run time, can download Kubernetes YAML manifests and helm charts. Also at run time, the demo client container uses kind to spin up an (optionally multi-node) Kubernetes cluster. After the Kubernetes cluster is running and the demo app is available, the user is now in a shell state where they have both kubectl and Helm access.
Clients are Included
Because the required versions of kubectl and helm are installed inside the demo container, there is no need to install these clients on the host.
Provide a Bespoke Cluster with Desired Add-Ons
As the provider of the demo container, you get to define what add-ons are populated in the Kubernetes cluster. This gives you the freedom to show how your application interacts with Kubernetes features such as Grafana, Prometheus, Jaeger, etc.
Cleans Up After Itself
When the user exits the interactive docker run, the cluster can be taken down and all containers can be killed. This will clean up all clients and demo applications from the user’s host.
Example: CyberArk Secretless Kubernetes Demo
To see an example of an “All You Need is Docker” demo, check out the CyberArk Secretless Broker Kubernetes Demo: https://github.com/diverdane/secretless-k8s-demo
Starting the Demo with Docker Run
To start the CyberArk Secretless Broker demo, run the following command:
docker run \
     --rm \
     --name secretless-demo-client \
     -p 30303:8001 \
     -p 3000:3000 \
     -v /var/run/docker.sock:/var/run/docker.sock \
     -it \
diverdane/secretless-k8s-demo:v1.17.0
The following table explains the fields used in this docker run command:
| Field/Option | Description |
--rm |
Remove the container after running |
--name secretless-demo-client |
Name to use for demo-client container |
-p 30303:8001 |
Map port 8001 (proxy for K8s dashboard) in demo container to port 30303 on the host.
This provides access to the dashboard at localhost:30303. |
-p 3000:3000 |
Map port 3000 in the demo container to port 3000 on the host. This provides access to the Grafana dashboard at localhost:3000. |
-v /var/run/docker.sock:/var/run/docker.sock |
This volume mapping maps the Docker socket in the demo-client container to the Docker socket in the host. This essentially means that the demo-client container: * Uses its own Docker client * Uses the host’s Docker daemon as Docker server. This configuration is referred to as “Docker-on-Docker.” |
-it |
Run the demo-client container in interactive/tty mode. |
diverdane/secretless-k8s-demo:v1.17.0 |
Run the dockerhub image diverdane/secretless-k8s-demo:v1.17.0 for this demo. This will load a kubectl version 1.17.0 binary in the demo-client container and spin up a kind cluster running Kubernetes 1.17.0. |
The Demo Container Startup
After running the above command, you’ll see a (containerized) kind cluster being created for you:
dleblanc@ca-Macbookpro-003:~$ docker run \ --rm \ --name secretless-demo-client \ -p 30303:8001 \ -p 3000:3000 \ -v /var/run/docker.socemo:v1.17.0docker.sock \ -it \ diverdane/secretless-k8s-demo:v1.17.0 Bringing up a cluster Creating cluster "secretless-kube" … ✓ Ensuring node image (kindest/node:v1.17.0) 🖼 ✓ Preparing nodes 📦 📦 📦 ✓ Writing configuration 📜 ✓ Starting control-plane 🕹️ ✓ Installing CNI 🔌 ✓ Installing StorageClass 💾 ✓ Joining worker nodes 🚜 Set kubectl context to "kind-secretless-kube" You can now use your cluster with: kubectl cluster-info --context kind-secretless Have a question, bug, or feature request? Let us know! https://kind.sigs.k8s.io/#community 🙂 |
After the cluster has been created, the demo container will deploy a “Pet Store” application along with a Secretless Broker sidecar container:
==================================================== The Secretless Broker Kubernetes demo is running!!! ==================================================== A Pet Store application pod has been deployed that contains both an application container and a CyberArk Secretless Broker sidecar container. The Secretless Broker sidecar container allows the application to connect to a password-protected Postgres database without any knowledge of database credentials!!! To see the Kubernetes resources that have been configured, start with the following commands: kubectl get namespaces kubectl get all -n quick-start-application-ns kubectl get all -n quick-start-backend-ns To see the CyberArk Secretless Broker in action, use the scripts in /root to create and list pets in the pet store: add_pet "Genghis D. Dog" add_pet "Miss Ava" add_pet "Mr. Roboto" list_pets ==================================================== |
And a Kubernetes Dashboard will be deployed:
================================================================== You can access the Kubernetes dashboard at the following location: http://127.0.0.1:30303/api/v1/namespaces/kubernetes-dashboard/services/https:kubernetes-dashboard:/proxy/ You will be prompted for login credentials. Run the following script to display the dashboard access token: get_dashboard_token ================================================================== |
And a Grafana Dashboard:
Waiting for Grafana pod to become ready OK Set up port forwarding for Grafana =============================================================== You can access the Grafana dashboard at the following location: http://127.0.0.1:3000 You will be prompted for a login username/password. To get the username/password credentials, run the following script: get_grafana_credentials ================================================================== |
Exploring the Docker Container Configuration on the Host
By running ‘docker ps’ in the Docker container shell, you can see that your local host has 4 containers running: a demo container, one Kubernetes master container and 2 worker node containers:
root@secretless-k8s-demo:~$ docker ps --format "{{.ID}}\t\t{{.Image}}\t\t{{.Names}}"
4fe0206277b4 kindest/node:v1.17.0                     secretless-kube-control-plane
1b8c9891fa24 kindest/node:v1.17.0                     secretless-kube-worker
11a452c66ff9 kindest/node:v1.17.0                     secretless-kube-worker2
5709695acbea diverdane/secretless-k8s-demo:v1.17.0   secretless-demo-client
root@secretless-k8s-demo:~$
|
This shows that the nodes are implemented as containers running directly on the host’s Docker bridge network.
Exploring the Kubernetes Cluster
The kubectl command can be used in the demo container shell to explore the cluster. For example, displaying the nodes in the cluster:
root@secretless-k8s-demo:~$ kubectl get nodes NAME STATUS ROLES AGE VERSION secretless-kube-control-plane Ready master 6h19m v1.17.0 secretless-kube-worker Ready <none> 6h18m v1.17.0 secretless-kube-worker2 Ready <none> 6h18m v1.17.0 root@secretless-k8s-demo:~$ |
Using the Kubernetes Dashboard
The demo deploys a Kubernetes Dashboard service in the cluster. To access the dashboard:
(1) In the demo container shell, run the `get_dashboard_token` script.
(2) Copy the displayed token into your clipboard.
(3) Open a browser and navigate to the dashboard URL:
http://127.0.0.1:30303/api/v1/namespaces/kubernetes-dashboard/services/https:kubernetes-dashboard:/proxy/#/login.
(4) You should see a Kubernetes Dashboard sign-in screen, as shown below. Select <Token>, then paste the token from step (2) into the ‘Enter Token’ field and select <Sign In>.
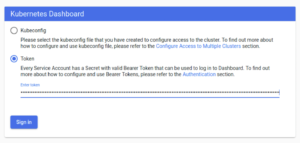
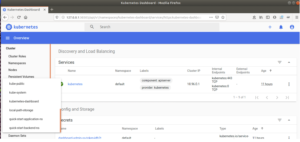
(5) At this point, you should see the Kubernetes Dashboard screen. You can select the `quick-start-application-ns` or `quick-start-backend-ns` and explore the demo namespaces:
Under the Covers: How Does it Work?
There were a few technical challenges in getting a demo client container to provide kubectl access and expose the Kubernetes and Grafana dashboards exposed on the local host.
“Docker-on-Docker” Operation
When you run kind from inside the demo container, it needs a way to ‘docker run’ Kubernetes node containers. This is achieved by using a “Docker-on-Docker” operation whereby the demo container uses:
- Docker Client: Its own Docker client
- Docker Server: The docker daemon of the host
This is accomplished by bundling the docker client in the container and starting the container with the following option to mount the host’s docker socket:
-v /var/run/docker.sock:/var/run/docker.sock
This means that running ‘docker ps’ in the demo-client container will show you the same running containers as you’d see when running ‘docker ps’ on the host.
Modifying kubectl Config to Point to the Master Node
When kind spins up a cluster, it also creates (or modifies) a kubectl config file that allows kubectl access to the kind cluster. Normally, kind sets up port forwarding between the Kubernetes master container and the host and uses a Kubernetes access IP of 127.0.0.1 (localhost) in the kubectl config.
When kind is run from inside a demo container, the host’s localhost address of 127.0.0.1 no longer applies. In order to provide kubectl access to the cluster from within the container, the Kubernetes server IP/port hostport address in kubectl config is modified from 127.0.0.1:<some-port> to <Master-Node-IP-address>:6443.
This is done in the `secretless_demo_runner` script that is executed when the demo container starts up:
MASTER_IP=$(docker inspect \
     --format='{{range .NetworkSettings.Networks}}{{.IPAddress}}{{end}}' \
     secretless-kube-control-plane)
sed -i "s/^    server:.*/    server: https:\/\/$MASTER_IP:6443/" \
     $HOME/.kube/config
Breaking this down, the first line in this sequence gets the Master node IP by using Docker to inspect the master node container. The second line in this sequence stream edits the kubectl config to modify the server field to use https://<master-ip>:6443 to access the Kubernetes API server.
Setting up kubectl Proxy for the Kubernetes Dashboard
For the demo, we would like to provide the participant access to the Kubernetes dashboard using a browser running on their host platform using a URL of the form http://127.0.0.1:30303/<some-path>. The plumbing required to accomplish this is two-fold:
- A “kubectl proxy” is run on the demo container, setting up a secure channel between the Kubernetes cluster and the demo client container. By default, the ‘kubectl proxy’ process serves on localhost. However, for the demo client container, we need it to serve on an IP that is accessible from the host, i.e. the container’s Docker network IP. The ‘kubectl proxy’ background process is started in the ‘secretless_demo_runner’ with the following:
CLIENT_IP=$(docker inspect \
         --format='{{range .NetworkSettings.Networks}}{{.IPAddress}}{{end}}' \
         secretless-demo-client)

    kubectl proxy \
         --address=$CLIENT_IP \
         --accept-hosts=^localhost$,^127\.0\.0\.1$,^\[::1\]$ &
Breaking this down, the first line in this sequence inspects the IP address of the demo client container. The second line in this sequence starts up a kubectl proxy process that serves on the demo client container’s IP address.
- The demo client container exposes the dashboard service on host port 30303 because the following argument was used when the container was started:
-p 30303:8001
Setting up Port Forwarding for the Grafana Dashboard
For the demo, we would like to provide the participant access to the Kubernetes dashboard using a browser running on their host platform, using a URL of the form http://127.0.0.1:3000. The plumbing required to accomplish this is two-fold:
- “kubectl port-forward” is run in the demo container for the Grafana dashboard service. This is done in the `secretless-demo-runner` script with:
    POD_NAME=$(kubectl get pods \
        --namespace grafana \
        -l "app=grafana,release=my-release" \
        -o jsonpath="{.items[0].metadata.name}")
    kubectl port-forward \
        --namespace grafana \
        --address $CLIENT_IP \
        $POD_NAME 3000:3000 &
Breaking this down, the first line in this sequence gets the name of the Grafana pod by looking for a pod that is in the namespace “grafana” and has the labels “app=grafana” and “release=my-release”. The second line sets up port forwarding between the Grafana pod port 3000 and the demo client container’s port 3000.
- The demo container exposes the demo client container’s port 3000 on the host’s port 3000 because the following docker run argument was used to start up the demo client container:
-p 3000:3000
System Requirements
Running the demo container will require enough disk space on the host for the required Docker images. As a guideline, here are some example image sizes:
| Image | Size |
| kindest/node:v1.17.0 | 1.23 GB |
| secretless-k8s-demo:v1.17.0 | 353 MB |
Drawbacks/Alternatives
- Alternative: Create demos and tutorials on Katacoda. For example, check out the CyberArk Secretless Broker on Kubernetes tutorial on Katacoda. The advantages to this approach are:
– Setup of a Kubernetes cluster is VERY fast
– Participant can be guided step-by-step, using only mouse clicks.
– Participant only needs a browser
The disadvantages to this approach are:
– The resulting demo/tutorial does not lend itself as well (compared to kind) for use in Continuous Integration (CI) testing.
– The Katacoda demo/tutorial would not support multiple Kubernetes clusters. - Alternative: If you drop the requirement to include the kubectl client, Helm client, and kind binary in the demo container (thus requiring the user to install these clients/binaries on the host), then it becomes possible to create of clusters using kind and the install helm add-ons with a simple script, rather than creating a container image.
– Install kubectl client, helm client, and kind binary
– Git clone a demo repo
– Run a “cluster spin-up” script that uses kind to spin up a cluster and deploys microservices using kubectl and helm clients.
This simplifies things, eliminating the need to do the steps described in the section “Under the Covers: How Does it Work?” – but the amount of time it takes to set up a demo probably wouldn’t change much.
- Alternative: Rather than having the participant use a long, convoluted ‘docker run’ command, create a downloadable Golang binary that abstracts the Docker details. This binary can also be designed to read a YAML config file, where the config contains settings such as:
– What version of Kubernetes/kubectl to use
– What ports should be used on the host e.g. for dashboards
– Anything demo specific - Drawback: Port forwarding for the Grafana dashboard can’t be executed until the Grafana pod and service are available. This means that the helpful display of how to access the dashboard needs to wait until the service is available.
Conclusion
If you have a Kubernetes-native application that you would like to showcase to potential users and collaborators, it helps to have a ready-made demo that has:
- Minimal pre-requisite setup
- Is repeatable and usable in any environment
- Is easy (and hopefully fun) to use
- Can demonstrate how your application interacts and integrates with other Kubernetes features and projects
- Leaves minimal changes to the participant’s host environment upon exit
This blog shows how a ready-made, “All you need is Docker” demo client container can be created that achieves the above objectives by bundling Kubernetes in Docker (kind), kubectl, helm, application manifests and charts for Kubernetes add-on features such as Kubernetes Dashboard and Grafana. When run, the demo client container can dynamically spin up a bespoke Kubernetes cluster for the demo participant to use that has all of the Kubernetes features and projects that you need to fully demonstrate the potential of your Kubernetes-native application.
I would love to hear your feedback and suggestions on this demo within the CyberArk Commons Community. Check out other tutorials on Conjur.org.

Dane LeBlanc is a Software Engineer at CyberArk, where he focuses on bringing Conjur to the open source community. He has a passion for observability and making things easy to deploy and troubleshoot. In his spare time, Dane loves running mountain trails, underwater photography, and hiking with his rescue dogs.
Comments are closed.