Secrets Management Policy Management through Java Spring Boot and Conjur
The primary task of a secrets management administrator is to effectively create and manage policies, add secrets, rotate secrets, create the Host, Layers, Groups and more. Mostly administration activities are done through CLI or through some sort of REST client. I typically use CLIs, but have been looking for alternatives. I decided it was high time to develop a Java project that uses Spring Boot for API consumption.
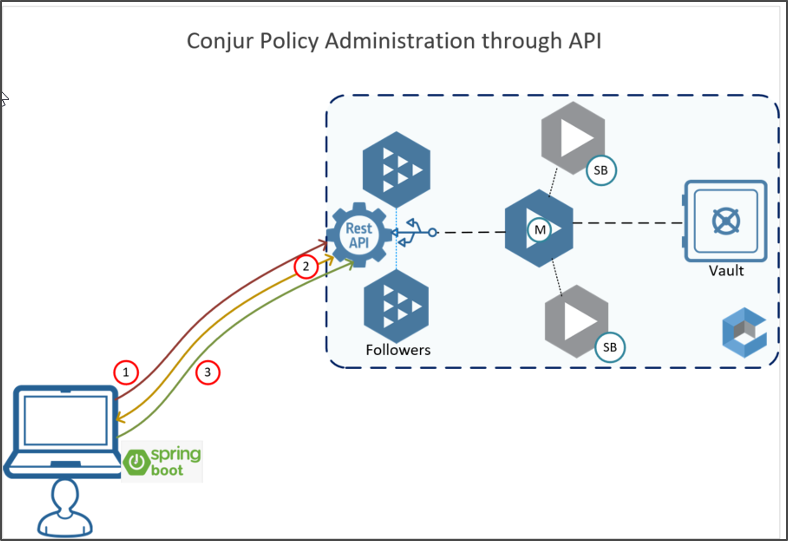
CyberArk Conjur Secrets Manager Enterprise, previously known as Application Access Manager Dynamic Access Provider (AAM DAP), provides a rich set of REST API services (available in Conjur Open Source also), enabling complete automation and support integration with modern industry standard IT systems. In this post, we’ll explore three client services I’ve developed, which will consume the respective Conjur REST Services. My goal is keep this overview simple, but provide enough technical details to help the wider community.
About Java Spring Boot
Spring Boot is part of the Spring framework, which facilitates the development of REST APIs. Spring Boot auto-configuration features can be used to achieve the right functionality. Spring Boot provides a lot of boilerplate code for converting our projects into war/jar files. Additionally, it supports popular inbuilt (or embedded) servers such as Tomcat, Jetty and Undertow.
Pre-Requisites (Tools Setup)
You’ll need the following tools to set up this solution:
- JDK 14
- Maven 3.6.3
- IDE (Eclipse or IntelliJ) – latest
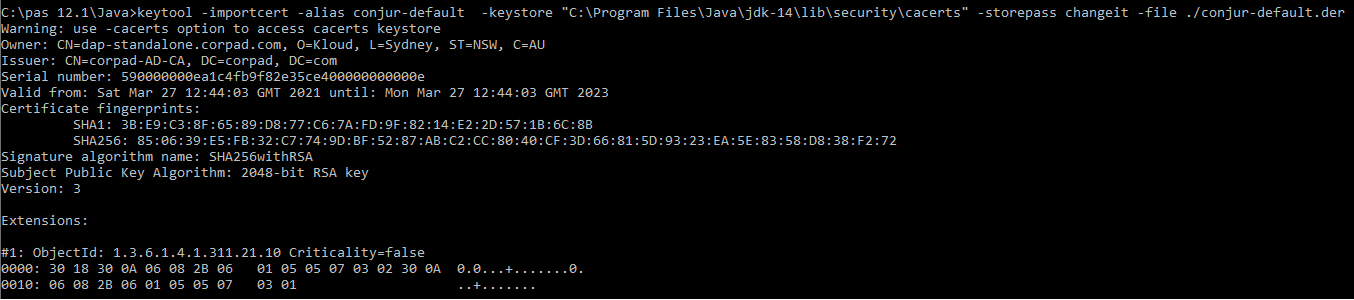
- Import Conjur Certificate into JVM trust store
Import Conjur Certificate into Java Key Store
Java does not work natively with the pem certificate encoding format; therefore, we need to convert it to the der format using the below command.
openssl x509 -outform der -in conjur.pem -out conjur-default.der
Next, we need to add the Conjur certificate into Java’s CA keystore that holds the list of all the allowed certificates for https connections.
keytool -importcert -alias conjur-default -keystore "C:\Program Files\Java\jdk-14\lib\security\cacerts" -storepass changeit -file ./conjur-default.der
Spring Boot Project Structure
In this demonstration, I’m using Eclipse and have created a simple Spring Boot project. You can refer to the POM.xml for the list of dependencies I’m using. For simplicity, I’ve created a project structure (packages) as shown in the below picture.
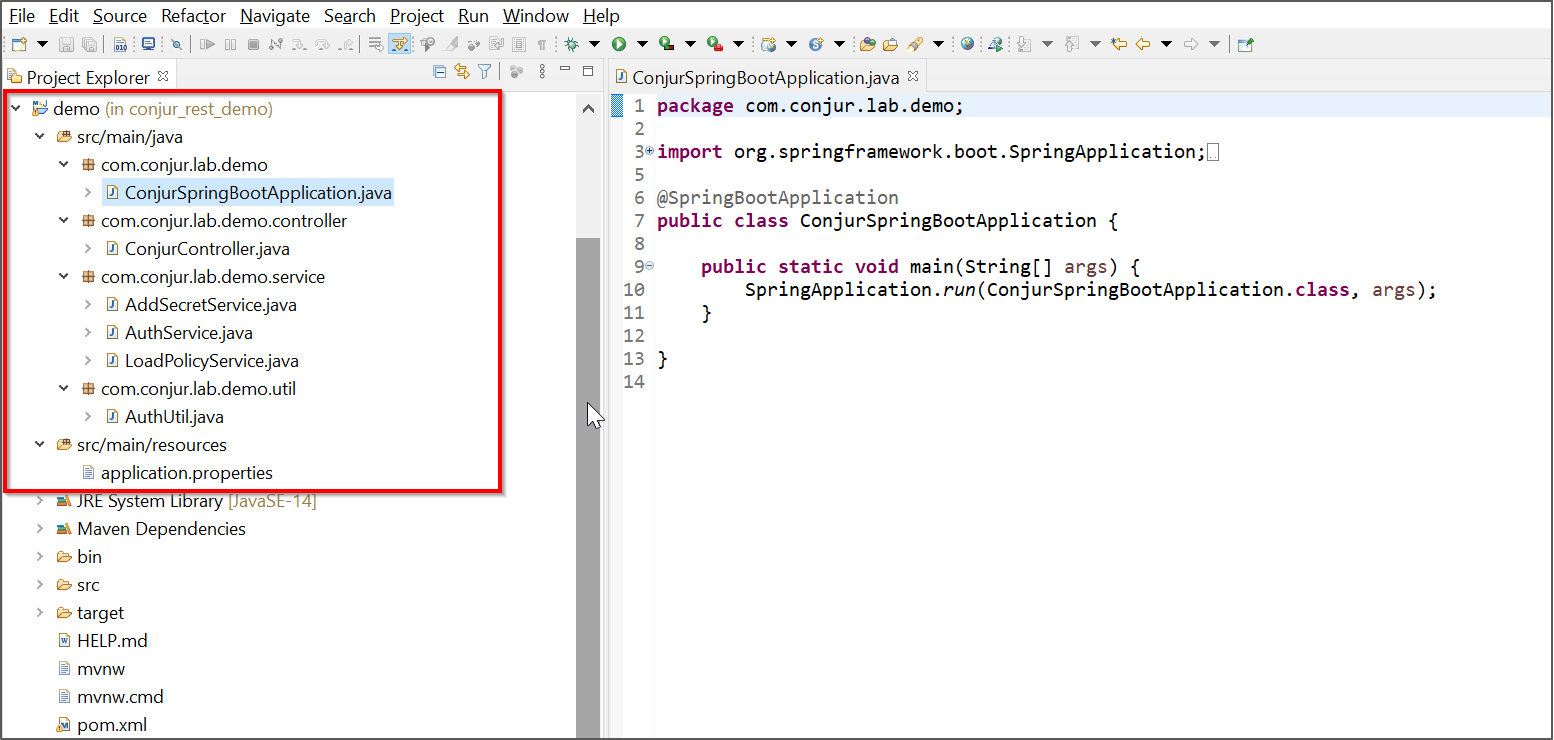
- ConjurSpringBootApplication.java is in a separate package -main and it is the starting point of the execution flow
- ConjurController.java is for the request mappings and is in the controller package
- Service package is for business logic and serve REST templates. GetAcccessToken, ADSecret and LoadPolicy are handled in separate service files
Retrieve Authentication Token
In order to consume any REST APIs, Conjur requires an authentication access token. We need to follow certain procedures to fetch the token, outlined in the following workflow:
- Get service credentials from Conjur (username and password)
- Encode them into base64 format (restadmin:Cyber@rkP1sswordConJ0r) => Base64=> cmVzdGFkbWluOkN5YmVyQHJrUDFzc3dvcmRDb25KMHI=
- Connect to Conjur REST API to retrieve API key
- Connect to Conjur REST API (using the above API key) to obtain Temporary Access Token. This token is only valid for eight minutes.
- Now, using the above access token, connect to Conjur REST API to perform an action, such as load policy, or create secret, hosts and groups.
Spring Boot Code Execution Flow
Stage 1: The below Java class (ConjurSpringBootApplication.java) is the first execution point in this project. Spring Boot @SpringBootApplication annotation is used to mark a configuration class that declares one or more methods and also triggers auto-configuration and component scanning.
package com.conjur.lab.demo;

import org.springframework.boot.SpringApplication;
import org.springframework.boot.autoconfigure.SpringBootApplication;

@SpringBootApplication
public class ConjurSpringBootApplication {

      public static void main(String[] args) {
            SpringApplication.run(ConjurSpringBootApplication.class, args);
      }
}
Stage 2: Define controller (ConjurController.java) which will map an HTTP request to a certain processing method. I’m calling three REST services in this demo, so therefore, I’ve declared three different methods as follows:
The below code snippets are taken from ConjurController.java to show the declared request mapping for REST services
      @RequestMapping("/getAccessToken")
      public ResponseEntity<String> getAccessToken() throws Exception {
             System.out.println("Inside : Controller : getAccessToken() ");
             return authService.getAccessToken();
      }

      @RequestMapping("/addSecret")
      public ResponseEntity<String> addSecret() throws Exception {
             System.out.println("Inside : Controller : addSecret()");
             return addSecretService.addSecret();
      }

      @RequestMapping("/loadPolicy")
      public ResponseEntity<String> loadPolicy() throws IOException, KeyManagementException, NoSuchAlgorithmException, KeyStoreException{
             System.out.println("Inside : Controller : loadPolicy()");
      return loadPolicyService.loadPolicy();
      }
Stage 3: Define service classes. Just to keep it simple, every single class will manage one or more REST services.
AuthService.java is the primary service class, which is essentially used to retrieve the Conjur access token. For any Conjur REST API call, this access token is mandatory. This Java code handles end- to-end business logic to fetch the required access token.
- First it will encode the service account credentials, which are present in the application.properties file
- Call Conjur REST API to get API Key ( Get https://dap-standalone.corpad.com/authn/{conjur accountname}/login)
- Next, using the above API Key, call Conjur REST API to get ( POST : https//{{dapHostname}}/authn/{{dapAccount}}/{{dapUsername}}/authenticate
// =======================================================================
// Step 1 : Service Credentials must converted Base64 format
// =======================================================================
String originalInput = username+":"+password;
String encodedString = Base64.encodeBase64String(originalInput.getBytes())

// =======================================================================
// Step 2: Connect to Conjur REST API to retrieve API Key
// =======================================================================

HttpHeaders headers = new HttpHeaders();
// set `content-type` header
headers.setContentType(MediaType.APPLICATION_JSON);
headers.set("Accept-Encoding","base64");
headers.set("Authorization", "Basic "+encodedString);
// build the request
HttpEntity<String> request = new HttpEntity<String>(headers);

String api_key_url=access_token_url+"/"+"authn"+"/"+account_name+"/"+"login";
ResponseEntity<String> response= restTemplate.exchange(api_key_url,HttpMethod.GET,request,String.class);

// =======================================================================
//Step 3: Connect to Conjur REST API to obtain Temporary Access Token
// =======================================================================
// RestTemplate restTemplate2 = new RestTemplate();
HttpHeaders headers2 = new HttpHeaders();
headers2.setContentType(MediaType.APPLICATION_JSON);
headers2.set("Accept-Encoding","base64");
HttpEntity<String> request2 = new HttpEntity<String>(response.getBody().toString(),headers2);
// {{dapHostname}}/authn/{{dapAccount}}/{{dapUsername}}/authenticate
access_token_url=access_token_url+"/"+"authn"+"/"+account_name+"/"+username+"/"+"authenticate";
ResponseEntity<String> response2= restTemplate2.postForEntity(access_token_url, request2,String.class);
System.out.println("Start Lived Token is : \n "+response2);
return response2;
Note: Entire code base is available at the GitHub – nirmal-dhanaraj/conjur_rest_demo: Conjur Policy Management through Java Spring-Boot
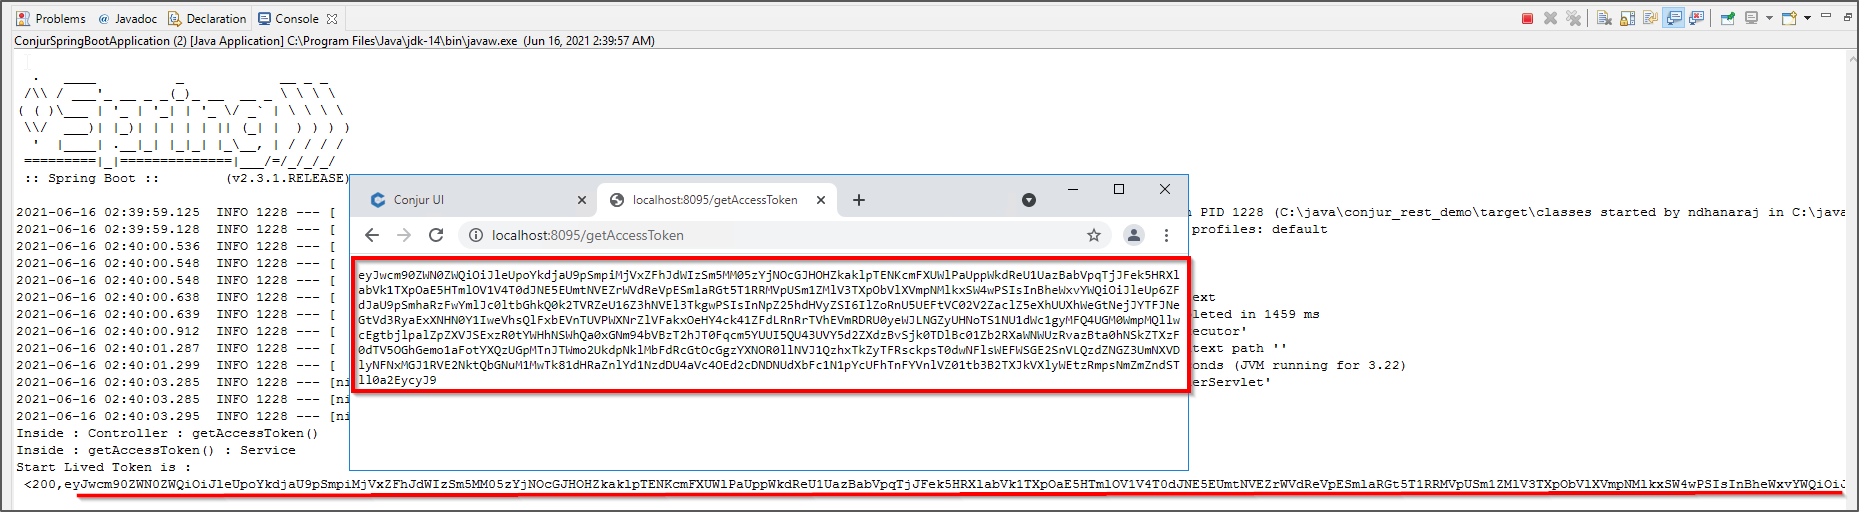
Get Access with Token()
Once the above is complete, execute the code either from command line or through Eclipse. The below screenshot shows the access token when we access the endpoints through a web browser:
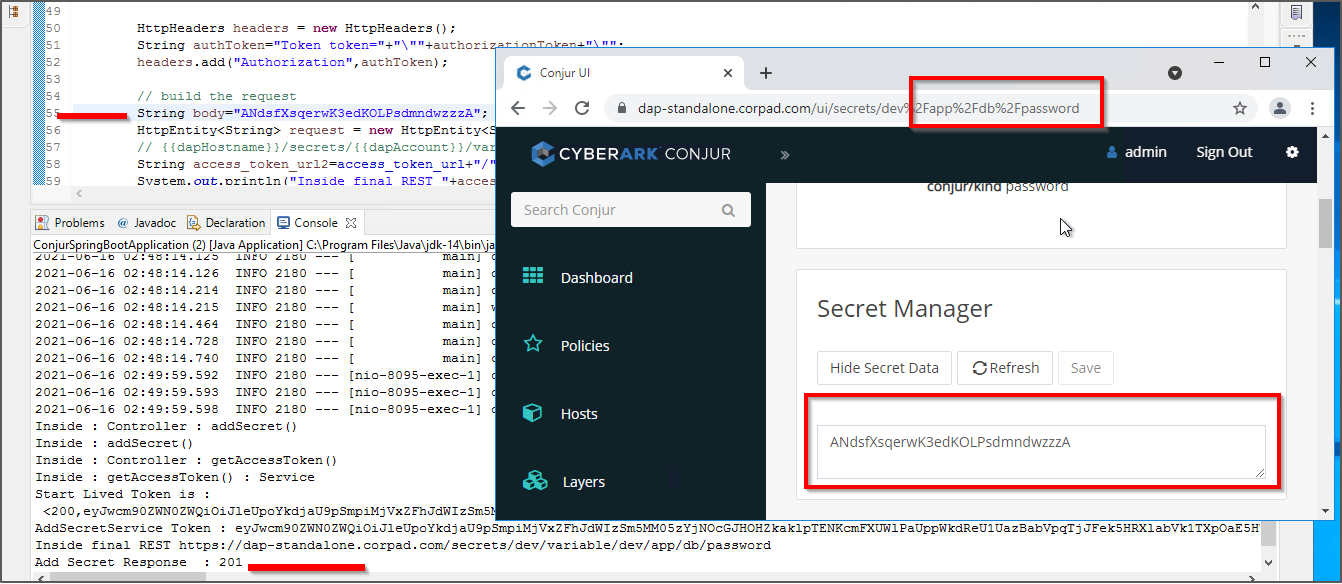
Add Secrets to the Vault with AddSecret()
Next is the demonstration of the outcome of addSecret endpoint. The execution flow for this is to call the getAccessToken first and then it will call addSecret endpoint using the retrieved access token.
The below screenshot depicts the outcome, in which the given secret is updated as shown in the Conjur portal.
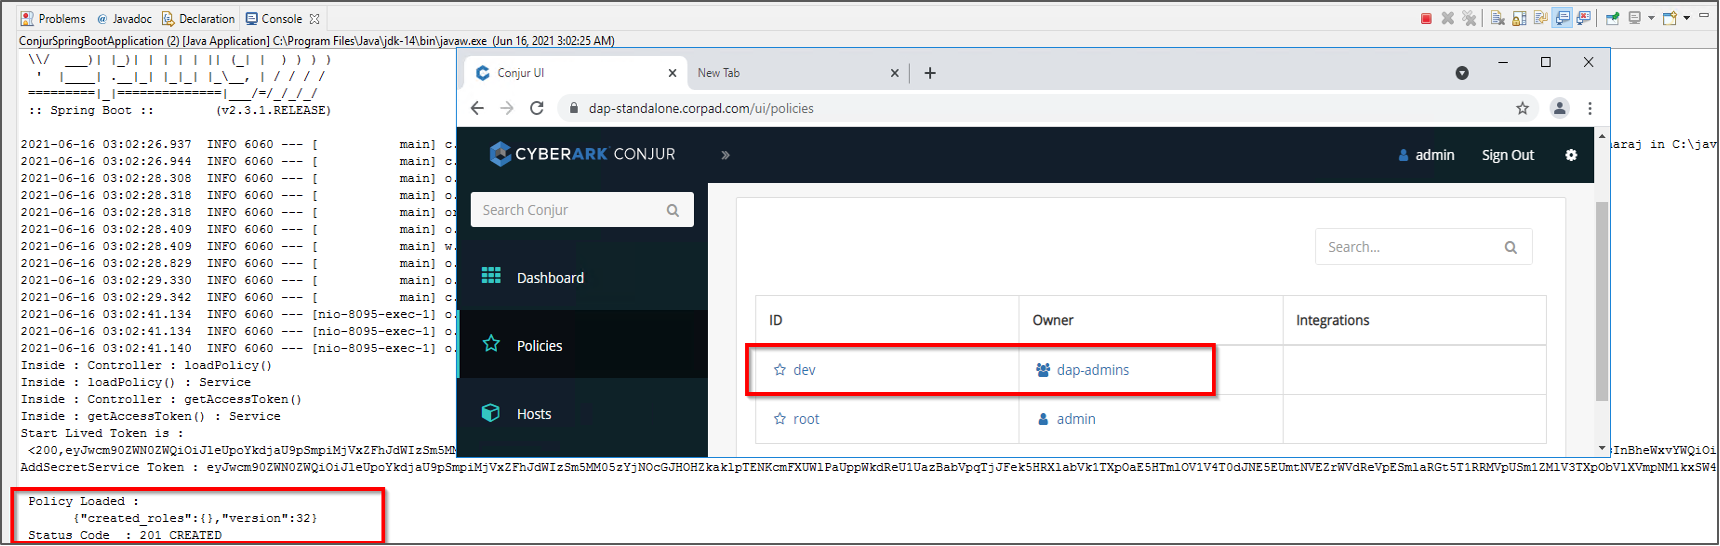
Initialize Secrets Management Policy with loadPolicy()
Next is loadPolicy endpoint. The execution flow for this is to call the getAccessToken first and then it will call loadPolicy endpoint using the previously retrieved access token.x
The below screenshot depicts the outcome, in which the given policy (YML formatted input) is updated as shown in the Conjur portal.
Summary
In this post I have demonstrated how we can manage Conjur policies and secrets through REST API using Spring Boot.
I encourage Conjur administrators and DevOps engineers to use this as a reference to build more use cases based on your own business requirements. And be sure to share them with the community by visiting and contributing to CyberArk developer community.

Nirmalkumar Dhanaraj is an external community contributor and Identity and Access Management professional with diverse knowledge in Analysis, design, implementation of Identity Management and Identity Access Governance solutions for large Financial, Insurance, Energy and Educational Institutions across the world.